Color Spaces
To work with colors deliberately we should understand how colors are represented on computer. This topic is devoted to this question.
Color is a complex phenomenon. To describe it, a number of color models were invented. Each of them has its merits and demerits. Some of them are convenient to represent color achieved because of radiating, other ones - for colors received by reflecting. Some of these models represent colors in the way which is independent from the device where this color is reproduced, others are depended on the device. A set of colors which can be represented by some color model is called a color space. The most wide-spread color models (supported by Graphics Mill for .NET) are examined below.
RGB Model
RGB is the most popular color model. Each pixel is represented as a combination of three primary colors - Red, Green and Blue (this model name is an abbreviation of these colors names). To produce a certain color, red, green and blue colors are added in some proportion. That's why this model is called additive model. When all three components are zero, we get the black color, and vice versa, when all the components have maximum value, we get the white color. It is shown on the figure below:

This way of color representation is widely used in computer monitors, television sets, and similar devices (which radiate). Each component specifies an intensity of red, green or blue phosphor. That's why this color model is so popular - it is natural for displaying images on the computer monitors.
It is obvious that this color model is device-dependent. Different monitors (even if they have the same vendor and even model) display colors differently. Even the same device displays color differently as time goes by (because of phosphors aging, quality loss and so on).
CMY(K) Model
Not all the colors are the result of illuminating. Most of objects in the world do not radiate, but nevertheless look colorful. These objects are seen in color because of the light reflection. When the light falls onto an object, some wavelengths are absorbed by the object, some of them are reflected. When all the wavelengths are reflected (and nothing is absorbed) we get the white color. When all the wavelengths are absorbed (and nothing is reflected), we get the black color. If we need to get some primary color from RGB model, we need to absorb two other primary colors. In fact, we subtract colors from white to get the color we need. That's why such model is called subtractive model (compare with additive RGB, where we add colors to black).
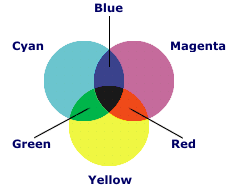
The subtractive analogue of RGB is the color model called CMY. CMY uses Cyan, Magenta and Y ellow as primary colors. These colors are selected as primary because cyan is obtained when we subtract red, magenta - when we subtract green and yellow - when we subtract blue (so we can say that CMY is inverted RGB). It is demonstrated on the figure below. Note, colors of this model are much less saturated than in RGB. It is caused by peculiarities of the subtraction model - if an object does not radiate, it is difficult to get bright and saturated color.
In theory subtractive CMY model is suitable for printing. Each component should specify the amount of cyan, magenta or yellow ink. To get black color we should mix all these inks. However in practice it is impossible to use this color model. The problem is that to get CMY model working correctly, you should use ideally pure, unadulterated inks. However it is almost impossible to create such clean colorants (at least at a reasonable cost). But if we use impure ink, we cannot get the proper result. For example if we mix all three inks, we will get dirty brown color instead of black.
The problem was resolved by adding a black component to the CMY triple. This modified color model is called CMYK (K means blacK; last letter instead of the first was taken as B could be mixed up with Blue). It allows to print pure black color (and it is cheaper than using three colors) and this model is widely used in practice. However using four components instead of three yields some problems. As the most images are stored in RGB color system, we need to convert them to CMYK before printing. Converting from RGB to CMY was very easy - you only had to invert pixels. Getting CMYK image is much harder. A special technique needs to be used (it is discussed further).
HSL Model
Color models which are presented as a sum of some primary colors are not always convenient to use. These models are not intuitive. Non-professionals can hardly understand what RGB or CMYK channels to change to make a color brighter or to change a tint. That's why other color models were proposed. Instead of intensities of primary colors, each pixel is represented as set of some color characteristics. An example of such a model is HSL - each pixel contains Hue, Saturation and Lightness.
Hue specifies the tint of the color. In the HSL model, hue is represented as an angle on the color wheel (see figure below). 0 degrees is considered as the red color, 120 degrees is the green color and 180 degrees is the blue color. Antipode points on the wheel (colors which are placed at the opposite points of the wheel) are called complementary colors. Pay attention that the primary colors of RGB model are complementary to the primary colors of CMY.

Saturation is the "depth", "purity" of the color. Low-saturated colors are close to gray, high saturated are close to the primary color. On the color wheel saturation is specified as a distance from the center of the wheel.
Lightness is the intensity of the color. Low lightness specifies that color is dark, close to black. High lightness specifies that color is close to white. Note, too high or too low values of lightness reduces maximum saturation (black or white color cannot be close to any primary color).
This color model may seem to be device independent, but it is not actually so. From the mathematical point of view, it is just another representation of the RGB color model. That's why images are never stored using this color system. However this model is often used during image processing. In particular, Graphics Mill for .NET allows to adjust hue, saturation and lightness of the image (using AdjustHsl transform).
Grayscale Model
There exists a special color model. It has the single channel with stores only pixel luminosity, and therefore it has no chrominance components (i.e. color information). Grayscale images typically have special application, e.g. in medical imaging.
Color Management
The main problem of all these color models is that they do not describe the color objectively. Each device (scanner, monitor or printer) has a particular range of colors that it is capable to display, which is called the device gamut . Almost every device has its unique gamut (because of different ways to produce color, device condition, quality and so on). It is possible to calibrate a device to produce the same result as some other, but in general the image which has certain colors on one device will have different colors on another device. For some kinds of business it is unacceptable. For example, if someone orders digital photos printed and receives pictures with dim and pale colors, they will never use this service again.
To make an image to be displayed identically on different devices, you should use so-called color management. The main idea of color management is to use so-called color profiles - a set of rules for some device how to convert its gamut to gamuts of other devices. To apply color management, we should have two profiles: profile of the image we want to display and profile of the device which should display this image. According to these profiles colors of input image are adjusted to be displayed correctly on the device.
Sometimes not all the colors can be displayed properly on the device, because an image can contain colors which are out of the gamut of the device (for example, low-cost printer cannot produce very saturated colors). The conversion policy that resolves the ambiguity of gamuts matching is called rendering intent . By specifying different intents, you may let the color management module know whether you prefer to preserve colors, tone range, etc.
Another problem which is solved by the color management is translating between RGB and CMYK color spaces. As mentioned above, this conversion is ambiguous. Some RGB color can be represented in CMYK in different ways. Moreover, gamuts of RGB and CMYK are noticeably different. There are a lot of colors in RGB color space which cannot be reproduced in CMYK and vice versa - some colors of CMYK cannot be achieved in RGB. Color profiles resolve these problems (however, it is recommended to avoid using colors which exist only in one color space anyway).
Where to get the color profiles? Color profile of the image is usually embedded into the image file (if this file format allows it). For example, if you scan an image, the scanner will produce a JPEG or a TIFF file with proper color profile inside. When you load such image into Graphics Mill for .NET, its color profile is available through ColorProfile property of the Bitmap class. The color profiles for the output device are usually shipped by the vendor of the device. Besides, some devices allow to create calibrated color profiles (for example, if you begin to use colorants of another vendor, you may need to re-calibrate your printer to get exact colors). To specify the output color profile to Graphics Mill for .NET, use RgbColorProfile, CmykColorProfile, or GrayScaleColorProfile properties of the ColorManagementProvider returned by the Bitmap . Color space of the profile should match the appropriate property. For example, if you convert to RGB color space or need to display an image on the monitor, specify the profile of the monitor in the RgbColorProfile property.
In addition to the input and output profiles, Graphics Mill for .NET handles third kind of profiles during color conversion - target device profiles. Let's assume that instead of converting to another color space you need to preview the result on your monitor. It is obvious that you need to specify one extra profile - the profile of target device (which you want to preview, e.g. printer). So we get the following chain: embedded image profile -> target device profile (e.g. printer) -> output device profile (e.g. monitor). To specify this profile, use the TargetColorProfile property.