Your First Application with AJAX Vector Objects
You can refer to the web-to-print solution based on AJAX Vector Objects, Customer's Canvas. You can consider it as a ready-to-use editor that you may want to embed into your website or as an example demonstrating how AJAX Vector Objects can be used for your needs.
This topic helps you to get started with AJAX Vector Objects. It provides step-by-step instructions for creating a simple web application, which allows designing business cards and saving them to PDF.
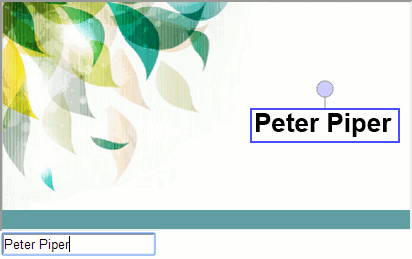
The picture below shows the final look and components of the card template:
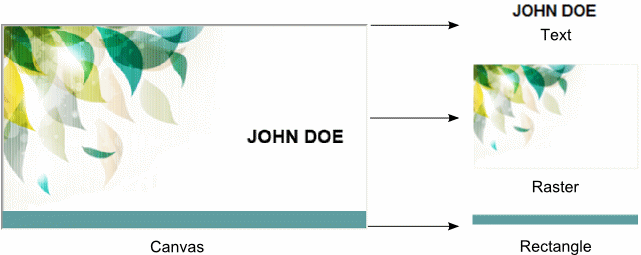
Let us discuss these components in more detail before creating the application:
- Canvas is a worksheet for designing the template with 510x284 pt size.
- Raster is a design background with 682x403 px size. It is important to prevent this element from interactive transformations.
- Text displays the cardholder name. The font settings are as follows: size 26 pt, name Arial, weight bold. As we are going to create a business card template, the text component should be editable.
- Rectangle may contain additional cardholder information. The rectangle size is 510x24 pt, and the color is cadet blue. Like the raster, the rectangle should be invariable.
Adding CanvasViewer to Page
AJAX Vector Objects provides two centerpiece objects: Canvas and CanvasViewer. Canvas stores a worksheet and allows you to manipulate graphics data on it. CanvasViewer is an ASP.NET control which displays Canvas in the web browser via HTML5 <canvas> .
The following steps describe how to create a website from scratch and add CanvasViewer into it:
-
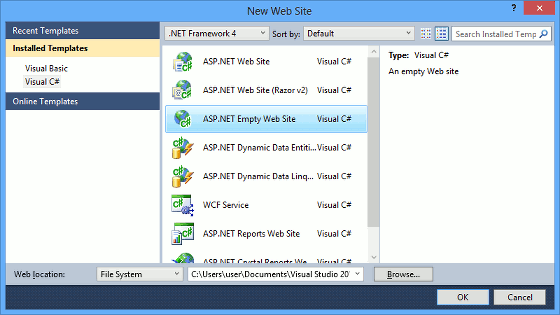
Create a new ASP.NET Web site (in Visual Studio 2010 menu File -> New -> Web Site...).
- Add a new webform (
default.aspx) that will host CanvasViewer to the project. -
Add references to AJAX Vector Objects assemblies. There are two ways to perform this:
- Adding the
Aurigma.GraphicsMill.AjaxControls.VectorObjects.dllassembly from the Graphics Mill Web Controls installation folder: create the/Binfolder in your project and add the DLL located inC:\Program Files\Aurigma\Graphics Mill 9 SDK\.Net 4.0\Binaries_xNNif you have .NET 4.0 or higher, whereNNis the the target platform of your application. -
Using NuGet package manager for .NET: open Tools -> NuGet Package Manager -> Package Manager Console in your Visual Studio and specify
Install-Package Aurigma.GraphicsMill.Web.x86orInstall-Package Aurigma.GraphicsMill.Web.x64according to the target platform of your application.If you prefer using the user interface for working with NuGet, you can install the package this way: open Tools -> NuGet Package Manager -> Manage NuGet Packages for Solution, enter
Graphics Mill Web Controlsto the search field, and chose the appropriate package: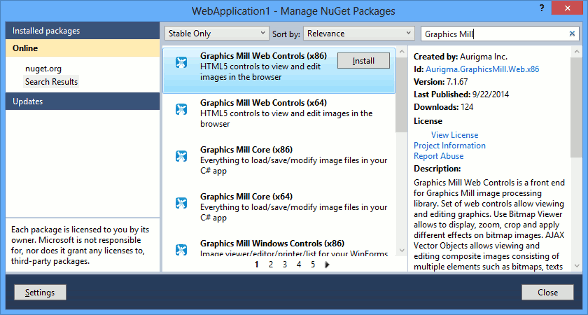
From here, you can continue to perform the following steps or just copy and paste the ASP.NET code below to the ASPX page.
- Adding the
- Add the ScriptManager ASP.NET control to the form. You can find it in the AJAX Extensions tab of the toolbox. This control allows AJAX Vector Objects to perform connections between the client and server sides via AJAX requests. That allows loading data dynamically and updating Canvas partially, without reloading the whole web page.
-
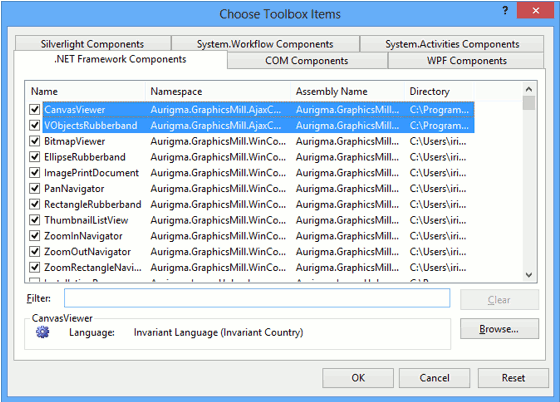
Add CanvasViewer to the toolbox:
- Right-click on the tab of toolbox where you want to add this control and select Choose Items...
- Find CanvasViewer in the .NET Framework Components tab.
- If you cannot find this component, click Browse... and find the
Aurigma.GraphicsMill.AjaxControls.VectorObjects.dllassembly in the/Binfolder of your project. -
Click OK on both Open and Choose Toolbox Items dialogs.
- Drag and drop the CanvasViewer control under the ScriptManager object.
- Set the
default.aspxpage as the start page. To perform this right-click this page in Solution Explorer and select the Set As Start Page menu option.
Configuring Control
To configure CanvasViewer according to our task requirements we need to edit the following control properties:
- The Width and Height properties specify the control size.
- The ZoomMode property specifies the zooming behavior of the control. In our sample we set the BestFit value, which calculates zoom settings automatically so that the design could fit the control.
- The ScrollBarsStyle property specifies when to display scroll bars on the control.
Choose the
autovalue, which automatically hides scroll bars, if the design fits in the control. - The Canvas class is associated with the control. The Canvas size is specified via the WorkspaceWidth and WorkspaceHeight properties that also define the design dimension.
Here is the result of the start page code:
<%@ Page Language="C#" AutoEventWireup="true" CodeFile="Default.aspx.cs" Inherits="_Default" %>
<%@ Register assembly="Aurigma.GraphicsMill.AjaxControls.VectorObjects" namespace="Aurigma.GraphicsMill.AjaxControls" tagprefix="aur" %>

<!DOCTYPE html PUBLIC "-//W3C//DTD XHTML 1.0 Transitional//EN" "http://www.w3.org/TR/xhtml1/DTD/xhtml1-transitional.dtd">
<html xmlns="http://www.w3.org/1999/xhtml">
<head runat="server">
    <title>AJAX Vector Object Sample</title>
</head>
<body>
    <form id="form1" runat="server">
        <asp:ScriptManager ID="ScriptManager1" runat="server" />
        <aur:CanvasViewer ID="CanvasViewer1" runat="server" Width="510" Height="284"
            ZoomMode="BestFit" ScrollBarsStyle="Auto">
            <Canvas ID="Canvas" WorkspaceWidth="510" WorkspaceHeight="284" />
        </aur:CanvasViewer>
    </form>
</body>
</html>
CanvasViewer configured in this way corresponds to the business card parameters.
Adding Objects
Our design comprises four objects: a Layer, a background raster (ImageVObject), a rectangular footer (RectangleVObject), and a string consisting of the card holder's name (PlainTextVObject).
Before creating these objects, we added the following namespaces to our application:
using Aurigma.GraphicsMill;
using Aurigma.GraphicsMill.AjaxControls.VectorObjects;
using Aurigma.GraphicsMill.AjaxControls.VectorObjects.Math;
The objects should be created before rendering the web page, so we use the Page_Load event. The complete code is as follows:
protected void Page_Load(object sender, EventArgs e)
{
    if (!Page.IsPostBack)
    {
        //creating the layer
        var layer = new Layer();
        CanvasViewer1.Canvas.Layers.Add(layer);

        //adding the background
        var background = new ImageVObject(new Bitmap(Server.MapPath("background.png")), false);
        //Resize the background to fit the Canvas
        background.Rectangle.Width = CanvasViewer1.Canvas.WorkspaceWidth;
        background.Rectangle.Height = CanvasViewer1.Canvas.WorkspaceHeight;
        background.Location = new PointF(0, 0);
        //locking the background
        background.Locked = true;
        layer.VObjects.Add(background);

        //drawing the rectangle
        var rectangle = new RectangleVObject(0.0f, 260.0f, 510.0f, 24.0f);
        rectangle.BorderWidth = 0;
        rectangle.FillColor = System.Drawing.Color.CadetBlue;
        rectangle.Locked = true;
        layer.VObjects.Add(rectangle);

        //writing the text
        var name = new PlainTextVObject();
        name.Name = "holderName";
        name.Text = "JOHN DOE";
        name.Location = new PointF(340, 142);
        name.FontSize = 26;
        name.Bold = true;
        layer.VObjects.Add(name);
    }
}
To help with understanding, let us discuss each step of the algorithm individually.
-
Creating the Layer object and adding it to the Canvas.Layers collection:
C#var layer = new Layer(); CanvasViewer1.Canvas.Layers.Add(layer);
You may wonder why the Layer object is created first. The answer is quite simple: you cannot draw raster and vector objects on Canvas itself. Therefore, you always have to create at least one Layer object that contains graphics objects in its Layer.VObjects collection.
-
Creating ImageVObject from the existing bitmap and adding it to the Layer.VObjects collection:
C#var background = new ImageVObject(new Bitmap(Server.MapPath("background.png")), false); //Resize the background to fit the Canvas background.Rectangle.Width = CanvasViewer1.Canvas.WorkspaceWidth; background.Rectangle.Height = CanvasViewer1.Canvas.WorkspaceHeight; background.Location = new PointF(0, 0); //locking the background background.Locked = true; layer.VObjects.Add(background);To make a background you can use any image in a format supported by Graphics Mill Web Controls. Here we use a
background.pngfile that was added to the application folder beforehand. To fit the background image to Canvas, specify its size so that it occupies the Canvas workspace. Also the VObject.Locked property prevents users from changing the image's size or position. -
Creating RectangleVObject (footer) specifying its settings and adding it to the Layer.VObjects collection:
C#var rectangle = new RectangleVObject(0.0f, 260.0f, 510.0f, 24.0f); rectangle.BorderWidth = 0; rectangle.FillColor = System.Drawing.Color.CadetBlue; rectangle.Locked = true; layer.VObjects.Add(rectangle);
-
Creating PlainTextVObject represented a cardholder's name, specifying its settings, and adding it to the Layer.VObjects collection:
C#var name = new PlainTextVObject(); name.Name = "holderName"; name.Text = "JOHN DOE"; name.Location = new PointF(340, 142); name.Font.Size = 26f; name.Font.FauxBold = true; layer.VObjects.Add(name);
The font name of the PlainTextVObject is "Arial" by default, exactly as we want it to be, thus we do not need to specify it.
The only thing left to do to make our application functional is to allow users to edit the cardholder's name. As a PlainTextVObject object cannot be edited by a user directly, first create an HTML text <input> and update the cardholder's name from its onKeyUp event:
<input id="editText" type="text" value="JOHN DOE" onkeyup="editText_onKeyUp(this.value)"/>
When a user has finished editing the cardholder's name, the text1_onKeyUp function replaces the cardholder's name with a user input:
function editText_onKeyUp(textEditValue) {
        var canvas = $find("<%= CanvasViewer1.ClientID %>").get_canvas();

        //finding PlainTextVObject by its name
        var plainTextVObject = canvas.get_layers().get_item(0).get_vObjects().getVObjectsByName("holderName")[0];

        //specifying layer and plainTextVObject as currently selected. This leads to appearing a board around the text on the canvas.
        canvas.set_currentLayerIndex(0);
        canvas.set_currentVObjectIndex(plainTextVObject.get_index());

        //replacing text of plainTextVObject with a value of the editor
        plainTextVObject.set_text(textEditValue);

        //redrawing canvas
        canvasViewer.get_canvas().redraw(true);
}
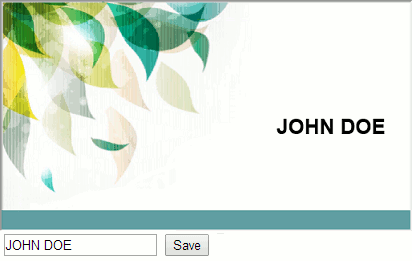
Now you can run the application and test it. Check that the design contains the background image, cardholder's name and footer. Make sure that the footer and background is locked, but that if you click on the cardholder's name a border will appear around it; this border means you can transform the object interactively, namely by moving, resizing, rotating, or deleting it. You can also try to change the cardholder's name as shown below:
Saving Your Design
As you remember, earlier we designed our application to save ready business cards to the PDF format. Now it is time to create this PDF:
- drag and drop the ASP.NET Button control to the form
- rename the button to
Save - create an empty SaveButton_Click event handler
- add the following code to the handler:
protected void SaveButton_Click(object sender, EventArgs e)
{

    //The result PDF has the 72 DPI resolution and its color space is RGB.
    using (var bitmap = CanvasViewer1.Canvas.RenderWorkspace(72, ColorSpace.Rgb))
    {
        bitmap.Save(Server.MapPath("out.pdf"));
    }
}
Now you can run the application and try it: change the cardholder's name, save the result to PDF, and open this PDF in any PDF viewer:
Let us look more closely at the rendering process. Before rendering Canvas, it synchronizes Graphics Mill Web Controls content with the server side via a postback. After the control deserializes its state on the server side, we trigger the saving of its content to PDF. AJAX Vector Objects allows you to render Canvas content to any image format supported by Graphics Mill Web Controls (for example, JPEG or PDF) and specify the resolution and color space of the resulting image.
See Also
Reference
- CanvasViewer Class
- Canvas Class
- ImageVObject Class
- PlainTextVObject Class
- RectangleVObject Class
- Layer Class