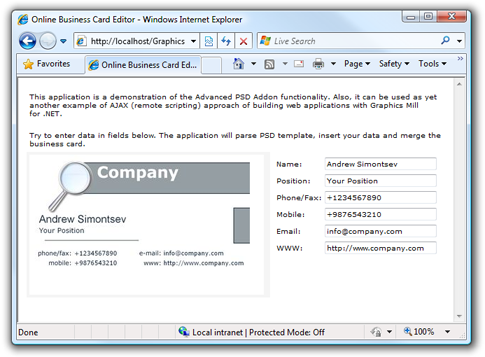
Building Online Business Card Editor
The most obvious example of the Advanced PSD Add-on usage is an application which builds business cards based on a PSD template. This topic discusses a web application which works in this way: the user enters their personal details and a business card is generated.
The full source code of this example can be found at Aurigma Forums:
http://forums.aurigma.com/yaf_postst3045_Web-Demos-Bundle-photo-cropping-TIFF-viewer-red-eye-removal-and-business-card-editor.aspx
Creating PSD Template in Adobe® Photoshop®
First of all we need to create a PSD template with high resolution (e.g. 300 DPI). Put a logo, captions, and placeholders (i.e. text layers which should be replaced during processing). As a result we will get something like this:
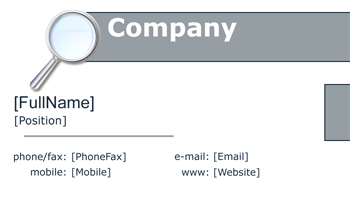
In our example we use 6 placeholders (they are rounded by square brackets on the figure above). It is important to distinguish these layers during processing, that's why we assign them special names:
- FullName
- Position
- PhoneFax
- Mobile
- Website
This way the Layers window in Photoshop® will be looking in the following way:
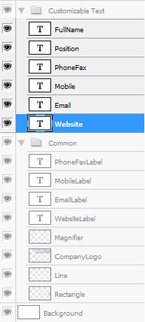
When creating any artworks in Photoshop®, do not forget that Advanced PSD Add-on does not provide 100% PSD format support. Keep in mind that if some Photoshop® feature is not listed in the Advanced PSD Add-on overview, most likely it will be disregarded when you process PSD file. That's why it is strongly recommended not to use vector masks, adjustment layers, etc.
If you cannot avoid using some of PSD features, feel free to create support case to discuss possible solutions.
Creating Editor Page
When we prepared one or more PSD templates, it high time to start building our web application. The first step is to design the user interface.
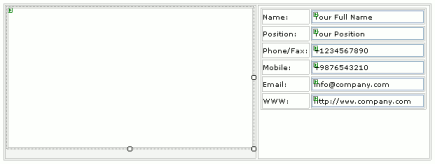
Create new ASP.NET page, and put the following elements onto it:
- BitmapViewer control which will be used to display a business card preview;
- 6 server Aurigma.GraphicsMill.WebControls.BitmapViewer controls which will be used to input user's personal details.
The layout of this page should be looking as follows:
Let's tweak parameters of the BitmapViewer.
- As our original template has high resolution it will be to large to be displayed. To make it loading faster and to reduce traffic, we will shrink the image displayed in the control. To do it, set the Zoom property to 0.35 (35%) value.
- To provide the highest quality during zoom operation, set the ZoomQuality property to High value.
-
One more trick to speed up loading speed - disable the low-resolution preview
image. Set the PreviewImageEnabled
property to
false. - To avoid calculating and hardcoding width and height parameters of the control (to display the image without scrollbars), let's have the control to get these values automatically. It can be easily done using the ZoomMode. Just set it to the ZoomControl value.
-
To optimize the performance, set the BitmapStateEnabled
property to
false. It will switch off bitmap state maintenance which is unnessary in our case (since we re-generate the bitmap during each page load).
For distinctness sake, let's name our Input (Text) controls as follows: TextFullName, TextPosition, TextPhoneFax, TextMobile, TextEmail, and TextWebsite.
Processing Placeholders in Template
The code which processes a PSD template and replaces placeholders by the user data, we will reuse the RasterizePsd method described in the Merging Layers topic.
To process the template add the following code into the Page_Load event handler:
Protected Sub Page_Load(ByVal sender As Object, ByVal e As System.EventArgs) Handles Me.Load

    If Not Page.IsPostBack Then

        Dim updatedLayers As New System.Collections.Specialized.NameValueCollection

        updatedLayers.Add("FullName", TextFullName.Value)
        updatedLayers.Add("Position", TextPosition.Value)
        updatedLayers.Add("PhoneFax", TextPhoneFax.Value)
        updatedLayers.Add("Mobile", TextMobile.Value)
        updatedLayers.Add("Email", TextEmail.Value)
        updatedLayers.Add("Website", TextWebsite.Value)

        BitmapViewer1.Bitmap = RasterizePsd(Server.MapPath("TestImages/BusinessCard.psd"), updatedLayers)

    End If

End Sub
protected void Page_Load(object sender, EventArgs e)
{
    if (!Page.IsPostBack)
    {
        System.Collections.Hashtable updatedLayers = new System.Collections.Hashtable();

        updatedLayers.Add("FullName", TextFullName.Value);
        updatedLayers.Add("Position", TextPosition.Value);
        updatedLayers.Add("PhoneFax", TextPhoneFax.Value);
        updatedLayers.Add("Mobile", TextMobile.Value);
        updatedLayers.Add("Email", TextEmail.Value);
        updatedLayers.Add("Website", TextWebsite.Value);

        BitmapViewer1.Bitmap = RasterizePsd(Server.MapPath("TestImages/BusinessCard.psd"), updatedLayers);
    }
}
After the page will be loaded in the browser, you will see the ready business card.
Using Remote Scripting: Updating Business Card Without Roundtrip
For better interactivity let's have the business card to be updated on each text field change. To do it, it is necessary to use the remote scripting approach (AJAX-like technique which enables to load data from server without roundtrips). It is done in two steps:
- Add a server-side method marked with the RemoteScriptingMethodAttribute atribute. In this method we will just fill the texFields collection with updated text values and process the business card template again.
- Call this method from the JavaScript using the invokeRemoteMethod function (see the Remote Scripting Approach (Web Controls) topic for more details on this).
Here is a code of the remote method:
<Aurigma.GraphicsMill.WebControls.RemoteScriptingMethod()> _
Public Sub Refresh()
    Dim updatedLayers As New System.Collections.Hashtable

    updatedLayers.Add("FullName", Request.Form("TextFullName"))
    updatedLayers.Add("Position", Request.Form("TextPosition"))
    updatedLayers.Add("PhoneFax", Request.Form("TextPhoneFax"))
    updatedLayers.Add("Mobile", Request.Form("TextMobile"))
    updatedLayers.Add("Email", Request.Form("TextEmail"))
    updatedLayers.Add("Website", Request.Form("TextWebsite"))

    BitmapViewer1.Bitmap = RasterizePsd(Server.MapPath("TestImages/BusinessCard.psd"), updatedLayers)
End Sub
[Aurigma.GraphicsMill.WebControls.RemoteScriptingMethod()]
public void Refresh()
{
    System.Collections.Hashtable updatedLayers = new System.Collections.Hashtable();

    updatedLayers.Add("FullName", Request.Form["TextFullName"]);
    updatedLayers.Add("Position", Request.Form["TextPosition"]);
    updatedLayers.Add("PhoneFax", Request.Form["TextPhoneFax"]);
    updatedLayers.Add("Mobile", Request.Form["TextMobile"]);
    updatedLayers.Add("Email", Request.Form["TextEmail"]);
    updatedLayers.Add("Website", Request.Form["TextWebsite"]);

    BitmapViewer1.Bitmap = RasterizePsd(Server.MapPath("TestImages/BusinessCard.psd"), updatedLayers);
}
You may noticed that text fields are accessed through the form rather than through the Value property of Input (Text) control (as it is implemented in the Page_Load). It is caused by the fact that the remote method is called before initialization of these controls. Such behavior is stipulated for optimization purposes to process the callback before initialization of all controls. It allows to eliminate full page initialization.
We will call this remote method on each modification of our text fields. In other words, text fields should have the following event handlers:
onchange="refresh();"
onkeyup="refresh();"
And the refresh function should be defined as follows:
var bitmapViewer1;

window.onload=function(){
    bitmapViewer1 = document.getElementById("<%=BitmapViewer1.ClientID%>");
    bitmapViewer1.addStatusChanged(bitmapViewer1_StatusChanged);
}

var needToRefresh = false;

function refresh(){
    if (!needToRefresh){
        needToRefresh = true;
        window.setTimeout("delayedRefresh()", 2000)
    }
}

function delayedRefresh(){
    if (bitmapViewer1.getStatus() != "Busy"){
        needToRefresh = false;
        bitmapViewer1.invokeRemoteMethod("Refresh", null);
    }
}

function bitmapViewer1_StatusChanged(){
    if (needToRefresh){
        window.setTimeout("delayedRefresh()", 1000)
    }
}
This code may appear a bit tricky. To avoid executing our remote method too often, we force it to be called not more often than in 2 seconds since previous call, and not earlier than after 1 second after previous refresh.
As a result, our application will work as follows: