Semiautomatic and Manual Modes
Graphics Mill provides two methods to redeem images from the red-eye effect:
- Using semiautomatic mode when the tool searches for red-eyes automatically in a specified facial region.
- Using manual mode when you have not only to specify facial region, but also point out spots with red-eye effect.
The semiautomatic mode is much more convenient than clicking to an eye, especially when the photo is significantly zoomed (e.g. in web interface) and it is difficult to click the eye precisely. But sometimes the manual mode cannot be replaced with the semiautomatic mode due to different image features.
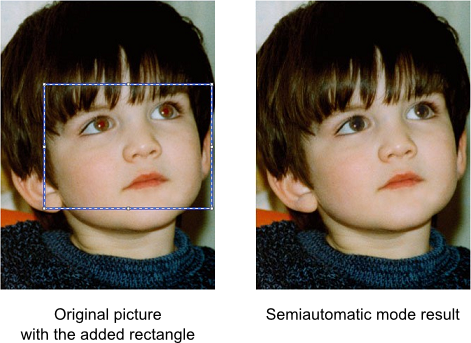
Semiautomatic Mode
Working in the semiautomatic mode you can just specify the face and the algorithm will find red eyes automatically and fix colors there.
To use Red Eye Removal in the semiautomatic mode you should:
- Create the Aurigma.GraphicsMill.Transforms.RedEyeRemoval class instance.
- Set the RedEyeRemoval.Mode property to RedEyeRemovalMode.Semiautomatic.
- Put the rectangle which specifies the facial area into the RedEyeRemoval.FaceRegion property.
- Apply the transform using the Apply(Bitmap) method.
The red-eye removal algorithm is sensitive to the area selected as a face. If you select too large or too small area, the algorithm can work incorrectly, especially if the background is reddish. Also, the algorithm takes into account the ratio of square of a face and potential red eyes. That's why you should select only a face with the minimum amount of hair and a background.
The following code example processes red-eye removal in the semiautomatic mode with the specified rectangle, which is added to the original image below for clarity.
using (var bitmap = new Bitmap(@"Images\in.jpg"))
using (var redEyeRemoval = new RedEyeRemoval())
{
    redEyeRemoval.Mode = RedEyeRemovalMode.Semiautomatic;
    redEyeRemoval.FaceRegion = new System.Drawing.RectangleF(61.0f, 119.0f, 239.0f, 178.0f);
    using (var newBitmap = redEyeRemoval.Apply(bitmap))
        newBitmap.Save(@"Images\Output\out.jpg");
}
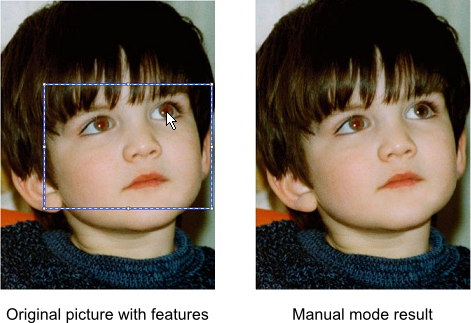
Manual Mode
The semiautomatic red-eye removal algorithm works fine for most photos, but sometimes it can get confused. It may happen when the photo has low contrast, skin tint is reddish, or the user selects the face inaccurately. In this case you can use the manual mode.
In the manual mode you need to choose each eye. Red Eye Removal searches boundaries of the red area and fixes colors here.
You still need to provide the facial rectangle. This is used to estimate the eye square to avoid "fixing" red areas outside of the eye.
In the manual mode you should take two more steps:
- Select a face with the RedEyeRemoval.FaceRegion property.
- Choose eye position specifying the RedEyeRemoval.EyePoint property.
Here is a code snippet which removes red-eye effect in the manual mode:
using (var bitmap = new Bitmap(@"Images\in.jpg"))
using (var redEyeRemoval = new RedEyeRemoval())
{
    redEyeRemoval.Mode = RedEyeRemovalMode.Manual;
    redEyeRemoval.FaceRegion = new System.Drawing.RectangleF(61.0f, 119.0f, 239.0f, 178.0f);
    redEyeRemoval.EyePoint = new System.Drawing.PointF(177.0f, 38.0f);
    using (var newBitmap = redEyeRemoval.Apply(bitmap))
        newBitmap.Save(@"Images\Output\out.jpg");
}
The result of this snippet shown in the picture below: