Interpolation Inside
What is the interpolation and why we need it? When we apply geometric transformations at raster image, we need to calculate new values of pixels of the image. For example when we resize image, a group of pixels turns into one pixel (when image size is reduced), or vice versa - one pixels turns into a block of pixels (when image is expanded). How to get new values of pixels? There are various strategies exist. They are called interpolation algorithms. Graphics Mill for .NET supports several of them. Let's examine them more detailed.
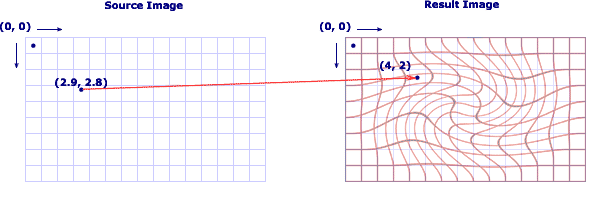
First of all, let's see how bitmap transformation algorithms work in general. Assume, that we apply effect on the source image, and we get deformated grid at the result image. The first thought is to iterate each pixel in the source image and calculate the coordinates in the result image. But obviously it can lead to the "holes" in the result image, because transformations are usually non-linear. That's why we should act in the opposite way - for each pixel in the result image we search the coordinates of pixel in source image. It is demonstrated on the figure below: we take pixel with coordinates (4, 2) in the result image and find that corresponding pixel of the source image has coordinates (2.9, 2.8). But in raster images all the coordinates have integer values. How to select the corresponding pixel in this case? Different interpolation mode solves this problem in different way. The algorithms implemented in Graphics Mill for .NET are described below.
Nearest Neighbour
Nearest neigbour algorithm assumes that we should take the nearest pixel to the calculated coordinates. In the above example the point with integer coordinates (3, 3) is closest to (2.9, 2.8). This way we just take the nearest pixel and disregard influence of another pixels in the vicinity. It works very fast (as we don't need to produce any mathematical operations), but the result is looking bad, because a lot of pixels are just thrown out. It will be especially visible we will downsample ("squeeze") a raster.
Bilinear
Bilinear interpolation is a smarter algorithm. It calculates result pixels according to values of 4 nearest pixels. Let's see our example to understand better how does it work. The 4 nearest pixel in the original images are (2, 2), (2, 3), (3, 2) and (3, 3). The result pixel is calculated in two steps: first we get weighted sum between (2, 2) and (2, 3) points taking fractional part of X coordinates 2.9 as weights of each member (it is called linear interpolation):
p1 = point (2, 2) * 0.1 + point (2, 3) * 0.9
and do the same with the second pair of point - (3, 2) and (3, 3):
p2 = point (3, 2) * 0.1 + point (3, 3) * 0.9
The second step is a linear interpolation between p1 and p2 values proportionally fractional part of Y coordinates 2.8:
result = p1 * 0.2 + p2 * 0.8
That's why this method is called bilinear - it makes two linear interpolations. It produces higher quality than nearest neighbour, but requires some calculations (additions and multiplications), that's why it works noticeable slower. However unfortunately sometimes the quality of the image produced by this algorithms is not good enough. There are 2 modifications of this method which provides higher quality: trilinear (we do three linear interpolations, as described below) and bicubic (the same as bilinear, but we use cubic interpolation instead of linear one).
Trilinear
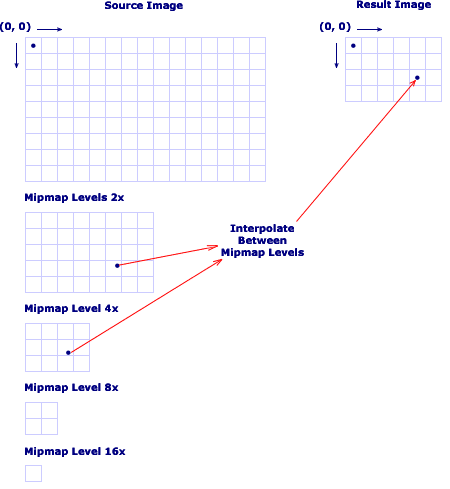
Trilinear interpolation is based on the previous algorithm, however it is modified in the following way. First of all we create so-called mipmap levels - halved copies of original bitmap (the zero mipmap level is an original bitmap, the first one - is a halved bitmap, the second - a halved first level (so it is quartered original image) and so on until we get one-pixel bitmap). This way we get 2x, 4x, 8x, 16x (etc) thumbanils. Mipmap levels also called details levels (because the close level number to 0, the more details does the image contains).
Now let's assume that we downsample image in 2.5x time. The idea of trilinear algorithms is to apply bilinear algorithm on two nearest details levels and apply third linear interpolation between results on these levels. For downsampling on 2.5x, we should use the first and the second mipmap levels (bitmap which is resize in 2x and 4x times). The figure below demonstrates the principle of this algorithm.
Two-Pass Algorithms with Filters
This class of algorithm is generally used for resizing, but it can be modified to work with another tranformations as well (currently Graphics Mill for .NET implements this approach only for resize). All of these algorithms use a simple idea: we should apply a transformation in two steps: first we should process one dimension, on the second stage - the second one. This approach is illustrated on the figure below:
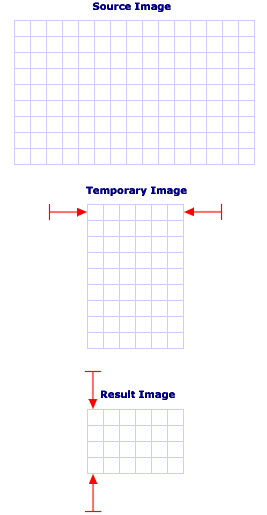
First, we resize the original image to the temporary image which has height of original image but width of the result image. Then we resize the temporary image to the result one changing only height. The distinction of the algorithms of this class is different filter functions. What are the filter functions? When we "squeeze" an image, we need to calculate the value of new pixel as weighted sum of neighbour pixels. But what weights to take? These weights are provided by the filter function. For example, the box filter means that all the weights are the same. Triangle filter means that the sum is linearly weighted. Bell filter specifies that weights calculated as Gaussian (with center in the target point). Another filters means another way of weights calculating. Graphics Mill for .NET supports the following filters in two-pass algorithms: box, triangle, bell, Hermite, spline, Mitchell and Lancoz filters. As usual the Lancoz filter produces the best result, but feel free to experiment.
These algorithms produce smooth antialiased result, but it is obviously that they are much slower than bilinear algorithm, because it requires to calculate filter function for each pixel.
Supersampling And Anisotropic
One of the most popular and most easy way to make transformed image looking smoothy is the supersampling. How does it work? The idea is simple: first of all, you need to resample an image in N times, after that apply transformation with nearest neighbour interpolation and then downsample it again in N times. During downsampling you should use the best quality you can. Smoothing which will be applied during downsampling will produce the very high-quality result. Here is demonstrated how to use supersampling technique:
'Supersampling factor
Dim factor As Integer = 4

'Upsample image by a intFactor without interpolation (interpolation is useless
'because image will be smoothed during downsampling)
bitmap.Transforms.Resize(bitmap.Width * factor, bitmap.Height * factor, _
 Aurigma.GraphicsMill.Transforms.InterpolationMode.LowQuality)

'Apply transformation without interpolation (interpolation is useless
'because image will be smoothed during downsampling)
bitmap.Transforms.Swirl(bitmap.Width \ 2, bitmap.Height \ 2, _
 2.5F, Aurigma.GraphicsMill.RgbColor.White, _
 Aurigma.GraphicsMill.Transforms.InterpolationMode.LowQuality)

'Downsample image by intFactor with high-quality interpolation
bitmap.Transforms.Resize(bitmap.Width \ factor, bitmap.Height \ factor, _
 Aurigma.GraphicsMill.Transforms.InterpolationMode.HighQuality)
//Supersampling factor
int factor = 4;

//Upsample image by a intFactor without interpolation (interpolation is useless
//because image will be smoothed during downsampling)
bitmap.Transforms.Resize(bitmap.Width * factor, bitmap.Height * factor,
    Aurigma.GraphicsMill.Transforms.InterpolationMode.LowQuality);

//Apply transformation without interpolation (interpolation is useless
//because image will be smoothed during downsampling)
bitmap.Transforms.Swirl(bitmap.Width / 2, bitmap.Height / 2,
    2.5f, Aurigma.GraphicsMill.RgbColor.White,
    Aurigma.GraphicsMill.Transforms.InterpolationMode.LowQuality);

//Downsample image by intFactor with high-quality interpolation
bitmap.Transforms.Resize(bitmap.Width / factor, bitmap.Height / factor,
    Aurigma.GraphicsMill.Transforms.InterpolationMode.HighQuality);
Draw attention, that here we resample up and apply swirl with nearest neighbour method, but downsampling this image with the spline filtering.
This method produces the best quality relatively all the other methods available in Graphics Mill for .NET. However it has some disadvantages. The main problem are big overheads. First of all, we need to make sampling and downsampling. These operations increases performance. Another problems is that we resample image up in 4 times (at practice scale factor can vary from 2 to 4, but sometimes it can be up to 16 (!) ). For scale factor 4, the image becomes in 4x4= 16 times larger, so it consumes incredibly lots of memory! But the memory is not single problem. As the image is in 16 times larger, the transformation algorithm itself will work in 16 times slower (as we need to process in 16 times more pixels). Thus this interpolation technique is the most expensive for CPU and memory, however it is a price for the best quality.
Can we take advantages of supersampling but avoid great overhead presumed by this method? Fortunately there is such an algorithm. It is called anisotropic interpolation method. Graphics Mill for .NET supports 2 modifications of such an algorithm. The idea of anisotropic interpolation is the following. When we iterate through pixels of the resulting image (as described above in general idea of bitmap transformation algorithms), we "resize" the current pixel (it can be various scale factors as for supersampling), calculate the source pixel for each item of "resized" pixel and average the results. This is equivalent to iterating with step 1/scale factor instead of just 1.
Let's assume that we apply anisotropic with scale factor 2. For example, we let's take pixel (5, 6). Anisotropic interpolation means that we should calculate pixels in source image for points with coordinates (4.75, 5.75), (5.25, 5.75), (4.75, 6.25), (5.25, 6.25) and compute result pixel as an average of these four pixels. The figure below demonstrates how does it works:
Graphics Mill for .NET supports anisotropic interpolation with 4 points (scale factor 2) and 9 points (scale factor 3).
Scale-to-gray Interpolation
Bitonal images is a separate class of images which requires special approach. Such images are usually used to store documents and faxes and it is popular problem is to resize bitonal document (for example to display it on the screen). When we work with the bitonal images (which has 1 bit per pixel) the methods described above does not work. These methods assumes that we can calculate new pixel as set of another pixels taken in some proportion. But the bitonal images cannot be taken in some proportion, because they have only two pixel color values. That's why only nearest neighbour method is available only. However when we resize bitonal documents using nearest neighbour algorithm, the quality is dramatically falls down. Here is displayed a document with 50% zoom (nearest neighbour):

As we can see this quality is not unacceptable for document imaging. Fortunately there is a technique which allows to display such an images antialiased (smoothed). The idea is very simple - we should just to convert bitonal image into grayscale one and apply some of algorithms, described above. Graphics Mill for .NET uses anisotropic interpolation to produce high-quality result. The figure below demonstrates the same document resized using scale-to-gray technique.
The similar technique can be applied for color indexed images (4-bit and 8-bit). It is called by analogy - scale-to-color.