Clipping Path
A clipping path is a closed vector path which is used to cut out part of a picture in image editing software. After the path is applied, the output will contain only the portion of the image inside, and anything outside the path will be removed. Usually clipping paths are needed to prepare images for designs; the most common task is to remove the background from an image and combine the remaining portion of the original image with another one. Clipping paths are stored in Adobe image resource blocks in TIFF, JPEG, and PSD image formats.
While performing geometrical raster transformations on images Graphics Mill is able to apply the same set of transformations on clipping path data. This allows you to keep the vector paths synchronized with the raster data.
The article below discusses the following tasks:
- copying the clipping path
- transforming the clipping Path
- converting the clipping path to a raster mask
Copying the Clipping Path
If you need to convert an image to another format, say JPEG to TIFF, and do not want to lose its clipping path data you can just copy it. There are two ways to copy the clipping path data:
- Using an image writer. You extract metadata from an ImageReader object and save it to an ImageWriter instance using the pipeline API. The example for this method is presented on the second snippet.
- Using image settings. You can create a WriterSettings instance, put Adobe image resource blocks containing a clipping path in it, and pass the object to the Bitmap.Save method.
To preserve the clipping path you can just copy the AdobeResources property from one image to another:
using (var reader = new JpegReader(@"Images\in.jpg"))
using (var bitmap = reader.Frames[0].GetBitmap())
{
    var jpegSettings = new JpegSettings();
    jpegSettings.AdobeResources = reader.AdobeResources;

    bitmap.Save(@"Images\Output\out.jpg", jpegSettings);
}
When copying a clipping path from one image to another, you do not need to copy all of the Adobe image resource blocks data. In this case you should extract the clipping path from the original image, create an empty Adobe image resource data block and put the path in it. As a picture can contain multiple clipping paths, they are located in blocks with indices 2000 (ID 0x07D0) - 2997 (ID 0x0BB6) (see the Photoshop file formats specification). The following code example illustrates how to copy the clipping path data using an image writer:
using (var reader = new JpegReader(@"Images\in.jpg"))
using (var writer = new JpegWriter(@"Images\Output\out.jpg"))
{
    if (reader.AdobeResources != null)
    {
        var adobeResources = new AdobeResourceDictionary();

        const int firstPathId = 2000;
        const int lastPathId = 2998;

        for (int i = firstPathId; i <= lastPathId; i++)
        {
            if (reader.AdobeResources.Contains(i))
                adobeResources[i] = reader.AdobeResources[i];
        }
        writer.AdobeResources = adobeResources;
    }
    Pipeline.Run(reader + writer);
}
Transforming Clipping Paths
Graphics Mill does not allow transforming clipping paths apart from the raster data. Instead, geometrical transformations change the bitmap and can adapt the path for the modifications. The following transformations support clipping paths: Resize, Crop, Matrix and Rotate. All transformations, except Resize, are suported in the pipeline API only. The pipeline applies transformations on the path only if the ImageReader.AdobeResources and IMetadataWriter.AdobeResources contain identical clipping paths, as illustrated here:
using (var reader = new JpegReader(@"Images\in.jpg"))
using (var writer = new JpegWriter(@"Images\Output\out.jpg"))
using (var crop = new Crop(reader.Width / 6, 0, reader.Width / 2, reader.Height / 2))
{
    writer.AdobeResources = reader.AdobeResources;

    Pipeline.Run(reader + crop + writer);
}
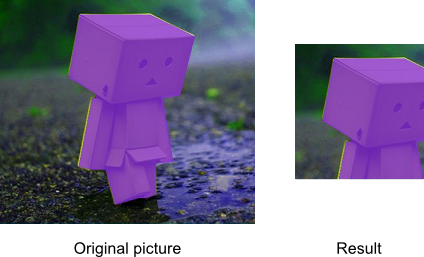
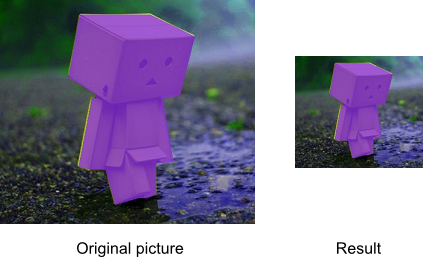
The following picture shows how the clipping path is changed along with the image. The area inside the clipping path is pictured by the color violet.
Resizing Images with Clipping Paths
Image resizing is the only transformation supporting both the pipeline and original API. The following two code snippets (with usage of original and pipeline API, respectively) produce the same clipping paths as those that result from image resizing:
using (var reader = new JpegReader(@"Images\in.jpg"))
using (var bitmap = reader.Frames[0].GetBitmap())
{
    var jpegSettings = new JpegSettings();
    jpegSettings.AdobeResources = reader.AdobeResources;

    bitmap.Transforms.Resize(reader.Width / 2, reader.Height / 2);

    bitmap.Save(@"Images\Output\out.jpg", jpegSettings);
}
using (var reader = new JpegReader(@"Images\in.jpg"))
using (var writer = new JpegWriter(@"Images\Output\out.jpg"))
using (var resize = new Resize(reader.Width / 2, reader.Height / 2))
{
    writer.AdobeResources = reader.AdobeResources;

    Pipeline.Run(reader + resize + writer);
}
Converting Clipping Path to Raster Mask
Graphics Mill allows you to remove the background from an image containing a clipping path highlighting an object contour. To perform this you need to convert the clipping path to a raster mask and set it as an alpha channel in the bitmap. The algorithm below discribes how to do this:
- Create a Path class instance using the Path.Create(Path, Int32, Int32) method.
- Draw the path on the raster mask using the Graphics.FillPath(Brush, Path) method.
- Set the raster bitmap as the alpha channel to the original bitmap using the ChannelsProvider.SetAlpha(Bitmap) method.
The following image was created with the code below:

using (var reader = new JpegReader(@"Images\1.jpg"))
using (var bitmap = reader.Frames[0].GetBitmap())
using (var maskBitmap = new Bitmap(bitmap.Width, bitmap.Height, PixelFormat.Format8bppGrayscale, System.Drawing.Color.Black))
using (var graphics = maskBitmap.GetAdvancedGraphics())
{
    var grPath = Path.Create(reader.ClippingPaths[0], reader.Width, reader.Height);
    graphics.FillPath(new SolidBrush(new GrayscaleColor(255)), grPath);
    bitmap.Channels.SetAlpha(maskBitmap);
    bitmap.Save(@"Images\Output\out.tif");
}
See Also
Reference
- ImageReader Class
- ImageWriter Class
- WriterSettings Class
- ImageReader.AdobeResources Property
- IMetadataWriter.AdobeResources Property
- Transforms Namespace
- Path.Create(Path, Int32, Int32) Method
- AdobeResourceDictionary Class