JPEG-Optimized Technique
Red Eye Removal takes effect only on small parts of an image - red-eyed pupils. That's why it is possible to avoid JPEG file recompression using the same technique as described in the Applying Lossless JPEG Transforms topic.
Red Eye Removal can be easily used in conjunction with the LosslessJpeg class to recompress only fixed pupils instead of the entire image. The article below discusses how to do it.
General Approach
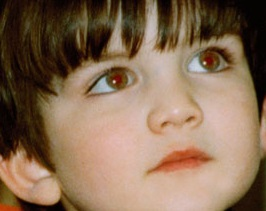
Let's assume that we process the following image:
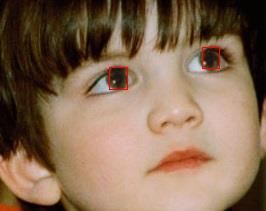
After applying the RedEyeRemoval transform the algorithm builds a mask which contains so-called blobs, i.e. elements of the image which are recognized as red eyes. Each blob consists of a bounding rectangle and location.
The RedEyeMask.Blobs property returns one or two blobs depending on the mode (see the Semiautomatic and Manual Modes topic). The figure below demonstrates blobs which were drawn as red rectangles:
The algorithm of lossless red-eye removal has the following steps:
- Load a JPEG file as the Bitmap.
- Apply red-eye removal (see the Semiautomatic and Manual Modes topic).
- Crop out all blobs.
- Patch the original JPEG file with cropped blobs.
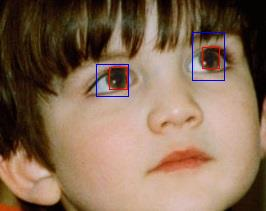
The JPEG patching technique cannot draw a bitmap with arbitrary coordinates. The coordinates must be aligned to the MCU size (Minimum Coded Units). To achieve this you can use the LosslessJpeg.AlignToMCUSize(Rectangle, JpegAlignToSampleSizeMode) method. This way you will recompress a slightly larger section of the image than an original blob, however it is more acceptable than recompression of the entire photo. The picture below represents added original (red rectangles) and aligned blobs (blue rectangles):
The following snippet performs the lossless JPEG red-eye removal in the semiautomatic mode (you can see the steps of the algorithm throughuot the example):
//1.    Load JPEG file
using (var bitmap = new Bitmap(@"Images\Red-Eye.jpg"))
using (var redEyeRemoval = new RedEyeRemoval())
{
    redEyeRemoval.Mode = RedEyeRemovalMode.Semiautomatic;
    redEyeRemoval.FaceRegion = new System.Drawing.RectangleF(0.0f, 0.0f, bitmap.Width, bitmap.Height);

    //2.    Apply red-eye removal
    using (var bitmapNoRedEye = redEyeRemoval.Apply(bitmap))
    using (var crop = new Crop())
    {
        var inputStream = new System.IO.MemoryStream();

        for (int i = 0; i < redEyeRemoval.Mask.Blobs.Length; i++)
        {
            LosslessJpeg losslessJpeg;
            if (i == 0)
                losslessJpeg = new LosslessJpeg(@"Images\Red-Eye.jpg");
            else
                losslessJpeg = new LosslessJpeg(inputStream);

            //3.    Crop out all blobs.
            crop.Rectangle = losslessJpeg.AlignToMCUSize(redEyeRemoval.Mask.Blobs[i].BoundingRectangle, JpegAlignToSampleSizeMode.Patch);
            using (var blobBitmap = crop.Apply(bitmapNoRedEye))
            {
                //4.    Patch the original JPEG file with cropped blobs
                // (If we patch the last blob, we save the result to a file. Otherwise save it to memory so that we could patch next blobs without using temporary files.)
                if (i < redEyeRemoval.Mask.Blobs.Length - 1)
                    losslessJpeg.WritePatched(inputStream, redEyeRemoval.Mask.Blobs[i].BoundingRectangle.Location, blobBitmap);
                else
                    losslessJpeg.WritePatched(@"Images\Output\Out.jpg", redEyeRemoval.Mask.Blobs[i].BoundingRectangle.Location, blobBitmap);

                losslessJpeg.Close();
            }

            losslessJpeg.Dispose();
        }
    }
}
See Also
Reference
- LosslessJpeg Class
- Aurigma.GraphicsMill.Transforms.RedEyeRemoval Class
- RedEyeRemoval.Mode Property
- RedEyeMask.Blobs Property