Sharpening Images
To make an image look sharper, Graphics Mill provides two methods: a simple sharpen filter and an unsharp mask. The article below demonstrates how to use both of them.
Sharpen
The common sharpen filter is easy to use. It has the single parameter - sharpen strength which varies in range [0,100]. The higher sharpen strength you specify, the more clearly defined sharpness you will get.
In Graphics Mill this filter is represented by the transform Sharpen. The filter strength is specified with the Strength property. For a shorter syntax you can also use the Sharpen(Int32) method of the TransformsProvider class returned by the Bitmap.
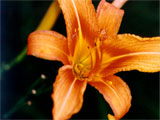
The figures below demonstrate the result of using this filter.
The source image:
The sharpened image:
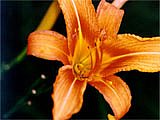
Use the following code to get the result above:
bitmap.Transforms.Sharpen(50);
Here is the same result, but using the Sharpen class.
using (var bitmap = new Bitmap(@"Images\in.jpg"))
using (var sharpen = new Sharpen())
{
    sharpen.Strength = 95;

    using (var newBitmap = sharpen.Apply(bitmap))
        newBitmap.Save(@"Images\Output\out.jpg");
}
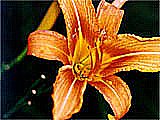
Note, high values of sharpen strength will produce color distortions (see the figure below).
Unsharp Mask
The sharpen filter is simple to use, but it provides too little control. That's why there is an alternative and more advanced sharpening algorithm - unsharp mask.
Unsharp mask is a classic sharpening technique which was widely used by photographers in precomputer times. The main idea is to blend an image with a blurred (out-of-focus) version. This emphasizes the edges and makes the resulting image sharper.
To apply the unsharp mask algorithm, Graphics Mill provides the transform class UnsharpMask (and the appropriate UnsharpMask(Single, Single, Single) method of the TransformsProvider class returned by the Bitmap). It contains three parameters: amount of sharpen, radius of blur and threshold.
The first parameter specifies how far to sharpen an image. As mentioned above the algorithm creates a blurred version of the image, and calculates the difference between original and blurred images for each pixel. After that it uses this different value to sharpen the image. Graphics Mill adds the difference*amount to each pixel of the original image. This parameter is modified with the Amount property.
The second parameter specifies radius of blur effect which creates a defocused image. The higher value you specify, the wider the edges will be. That's why you should be careful adjusting this parameter - the big radius leads to unnatural effects, namely a false halo around objects in the image. This parameter is modified with the Radius property.
The third parameter specifies the threshold of the effect. If the difference between the pixels of the original and blurred images is less than the specified threshold, then this difference is discarded. This allows you to keep minor details unchanged and applies sharpening only on noticeable details. For example, if you sharpen a photo which contains a face, you would like to sharpen facial features (a nose, lips, eyes, etc.), but not to emphasize pimples, birthmarks and other minor details. This parameter is modified with the Threshold property.
As you can see it is harder to use the unsharp mask instead of the sharpen filter, but doing so allows you to produce much better results. The figure below demonstrates the resulting image using the unsharp mask.
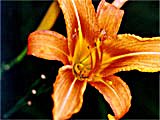
The code below demonstrates how to get this image:
bitmap.Transforms.UnsharpMask(1.5f, 2.1f, 0.04f);
Here is the same, but using the UnsharpMask class.
using (var bitmap = new Bitmap(@"Images\in.jpg"))
using (var unsharpMask = new UnsharpMask())
{
    unsharpMask.Amount = 1.5f;
    unsharpMask.Radius = 2.1f;
    unsharpMask.Threshold = 0.04f;

    using (var newBitmap = unsharpMask.Apply(bitmap))
        newBitmap.Save(@"Images\Output\out.jpg");
}