Adding Red-Eye Removal Functionality to Windows Applications
Red-Eye Removal cannot work in 100% automatic mode (i.e. without any user interaction). That's why it is necessary to design convenient user interface. This topic discusses how to organize the user interface for red-eye removal functionality in Windows application.
Semiautomatic Red-Eye Removal
In semiautomatic mode it is necessary to provide ability to select red-eyed face. Ideal solution for that is to use the Aurigma.GraphicsMill.WinControls.RectangleRubberband class in a combination with the Aurigma.GraphicsMill.WinControls.BitmapViewer. See the Using Navigators and Rubberbands (Windows Forms) topic for more information about rubberbands.
After the user selects a face, they need to click some button which runs the following code:
Private Sub ButtonRemove_Click(ByVal sender As System.Object, ByVal e As System.EventArgs) Handles ButtonRemove.Click
    Dim redEyeRemoval As New Aurigma.GraphicsMill.Transforms.RedEyeRemoval
    redEyeRemoval.Mode = Aurigma.GraphicsMill.Transforms.RedEyeRemovalMode.Semiautomatic
    redEyeRemoval.FaceRegion = System.Drawing.RectangleF.op_Implicit(RectangleRubberband1.Rectangle)

    redEyeRemoval.ApplyTransform(BitmapViewer1.Bitmap)
End Sub
private void ButtonRemove_Click(object sender, System.EventArgs e)
{
    Aurigma.GraphicsMill.Transforms.RedEyeRemoval redEyeRemoval =
        new Aurigma.GraphicsMill.Transforms.RedEyeRemoval();
    redEyeRemoval.Mode = Aurigma.GraphicsMill.Transforms.RedEyeRemovalMode.Semiautomatic;
    redEyeRemoval.FaceRegion = RectangleRubberband1.Rectangle;

    redEyeRemoval.ApplyTransform(BitmapViewer1.Bitmap);
}
To get detailed explanations of this code, see the Semiautomatic Red-Eye Removal topic.
Manual Red-Eye Removal
When red-eye removal is made in manual mode, it is required not only select a face, but also pick eyes with a mouse. Most convenient both from developer and user point of view would be to handle the ViewerBase.WorkspaceMouseDown event and call the following code there:
Private Sub BitmapViewer1_MouseDown(ByVal sender As Object, ByVal e As System.Windows.Forms.MouseEventArgs) Handles BitmapViewer1.MouseDown
    Dim redEyeRemoval As New Aurigma.GraphicsMill.Transforms.RedEyeRemoval
    redEyeRemoval.Mode = Aurigma.GraphicsMill.Transforms.RedEyeRemovalMode.Manual
    redEyeRemoval.EyePoint = New System.Drawing.PointF(e.X, e.Y)

    redEyeRemoval.ApplyTransform(BitmapViewer1.Bitmap)
End Sub
private void BitmapViewer1_BitmapMouseDown(object sender, System.Windows.Forms.MouseEventArgs e)
{
    Aurigma.GraphicsMill.Transforms.RedEyeRemoval redEyeRemoval =
        new Aurigma.GraphicsMill.Transforms.RedEyeRemoval();
    redEyeRemoval.Mode = Aurigma.GraphicsMill.Transforms.RedEyeRemovalMode.Manual;
    redEyeRemoval.EyePoint = new System.Drawing.Point(e.X, e.Y);

    redEyeRemoval.ApplyTransform(BitmapViewer1.Bitmap);
}
This code is discussed more detailed in Manual Red-Eye Removal topic.
However you may find it awkward to have the user to select a face for manual mode. To increase usability, it is highly recommended to organize the user interface in such way to reuse the facial region selected for semiautomatic mode. Most natural way to do it is to use wizard-like interface.
Wizard-like Red-Eye Removal
Wizard-like user interface means that it is splitted on several screens and the user can switch between them using Next/Previous buttons. Let's see how we can organize red-eye removal wizard on example of demo application, located at the following link:
http://forums.aurigma.com/yaf_postst3039_Red-Eye-Removal-Demo.aspx
This wizard contains three steps. Let's examine each of them.
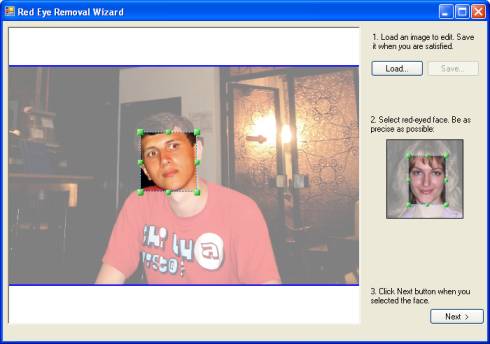
Step 1
On the first step the user:
- Opens the image.
- Selects a face.
Also, the user gets back to this step when they complete red-eye removal. They can save the result on here.
For clarity, each element of the user interface is labeled with a brief comment. Since accuracy of face selection matters, an image demonstrating how to select face properly is placed there too.
The first step looks as follows:
Step 2
While switching between step 1 and 2, semiautomatic red-eye removal algorithm is applied. On this step the user should specify whether algorithm worked as expected or not. To make it easier to see the result, the image is zoomed to enlarge the selected face to size of the control.
If the result is fine, the user clicks Yes button. After that they get returned back to the step 1 where they can select one more face or save the result to disk and proceed with another photo.
If the algorithm mistakes, the user clicks No. In this case they are moved to the next step where manual red-eye removal can be applied.
The second steps looks as follows:

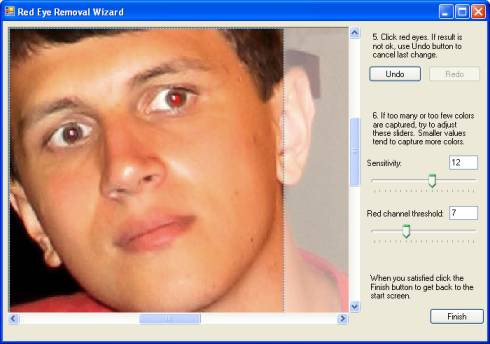
Step 3
On the third step the user can remove red-eye effect manually. To do that they should click red-eyed areas. To make it easier to click the eye accurately, the face is also zoomed here.
If the algorithm "fixed" the image incorrectly (e.g. if the user clicked outside of an eye or if the algorithm captured too many colors), the user can revert to the previous state by clicking Undo button. They can also use Redo button to re-apply this change.
For some photos even manual red-eye removal can work too inaccurate. Typically it happens for low-contrast images, or when the face skin is reddish. In this case the user can play with Sensitivity and Red channel threshold sliders. Reducing these values lead to increasing of the square of captured pixels (i.e. affected by the algorithm). Default values of these sliders should be ok for most photos though, so sliders are necessary only as a last resort.
When the user is satisfied with the result, they click the Finish button which leads them to the step 1. They can repeat these operations one more time for another face or photo.
The third step looks as follows: