Semiautomatic Red-Eye Removal
Red-Eye Removal is able to remove red-eye effect in semiautomatic mode. It means that it is enough to specify the face and algorithm automatically will find red eyes and fix color there. This is much more convenient than clicking to the eye, especially when the photo is significant zoomed (e.g. in web interface) and it is difficult to click the eye precisely.
To use Red-Eye Removal in semiautomatic mode, you should:
- Create the Aurigma.GraphicsMill.Transforms.RedEyeRemoval class instance.
- Set the RedEyeRemoval.Mode property to RedEyeRemovalMode.Semiautomatic.
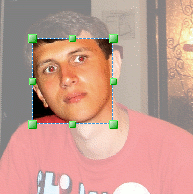
- Put the rectangle which specifies the area occupied with a face into the RedEyeRemoval.FaceRegion property.
- Apply the transform with a help of the ApplyTransform method.
Red-eye removal algorithm is sensitive to the area selected as a face. If the user selects too large or too small area, the probability of mistake increases. It may be critical if the background is reddish. Also, the algorithm takes into account the ratio of square of the face and potential red eye. That's why it makes sense to give the user some guidelines to select only face (with minimum amount of hair and background).
The simplest way to give the user possibility to select a face is to add a rectangle rubberband to your application.
Here is a code demonstrating this:
Dim redEyeRemoval As New Aurigma.GraphicsMill.Transforms.RedEyeRemoval
redEyeRemoval.Mode = Aurigma.GraphicsMill.Transforms.RedEyeRemovalMode.Semiautomatic
redEyeRemoval.FaceRegion = faceRect
redEyeRemoval.ApplyTransform(sourceBitmap)
Aurigma.GraphicsMill.Transforms.RedEyeRemoval redEyeRemoval =
    new Aurigma.GraphicsMill.Transforms.RedEyeRemoval();
redEyeRemoval.Mode = Aurigma.GraphicsMill.Transforms.RedEyeRemovalMode.Semiautomatic;
redEyeRemoval.FaceRegion = faceRect;
redEyeRemoval.ApplyTransform(sourceBitmap);