How to Overlay Images
One of the main application fields of Graphics Mill is preprint solutions. Often such applications require overlaying of a background image with another one. It means that a user should have the ability to change position of the overlay image, resize it and make other transformations interactively. This article describes how to implement this functionality using Vector Objects and describes two approaches: simple and memory friendly.
- The simple approach is easy to implement but it is inconvenient for large images. For example, if you want to overlay a full-size photo with another one, your application will need to commit much memory. Therefore, you may use this approach if you work with small images.
- The memory friendly approach is more difficult to implement than a simple one. However, it allows avoiding the memory problem. We recommend to use this approach for handling images of large size or to speed your application up.
Both approaches use the BitmapViewer + VObjectsRubberband combination. Find the additional information about using BitmapViewer and VObjectsRubberband bundle in Using V-objects With the BitmapViewer Control topic.
Simple Approach
The main idea of this approach consists of the following:
- Instantiate the BitmapViewer and VObjectsRubberband objects in the application.
- Assign the rubberband created on the previous step to the Rubberband property of the BitmapViewer instance. Find more detailed information about rubberbands in Using Navigators and Rubberbands (Windows Forms) topic.
- Load the background image to the BitmapViewer using the BitmapViewer.Bitmap property.
- Create the ImageVObject and load the overlay image to it.
- Add the overlay image v-object to the corresponding layer using the VObjectsRubberband.Layers property.
- Then users are able to change position of the overlay image on the background using mouse control; resize, rotate or skew it by dragging the corresponding grips.
- When all preparations are done, call the method which merges the overlay and background
images together and saves the result to a file. The implementation of this method consists of
two parts:
- Call the VObjectsRubberband.RenderWorkspace method which returns a bitmap with the overlay image rendered on a transparent background. All the user transformations are applied onto overlay image during rendering. The bitmap returned by the method VObjectsRubberband.RenderWorkspace has the same dimensions as the background image loaded to the BitmapViewer.
- Merge the rendered overlay bitmap with the background image using the Bitmap.Draw method.
The code sample below demonstrates this approach:
Dim backgroundImageFilname As String = "..\..\img1.JPG"
Dim overlayImageFilename As String = "..\..\img2.JPG"

Private Sub Form1_Load(ByVal sender As System.Object, ByVal e As System.EventArgs) Handles MyBase.Load

    ' Load the background and overlay bitmaps.
    Dim backgroundImage As New Aurigma.GraphicsMill.Bitmap(backgroundImageFilname)
    Dim overlayImage As New Aurigma.GraphicsMill.Bitmap(overlayImageFilename)

    ' Load the background image to the BitmapViewer.
    BitmapViewer1.Bitmap = backgroundImage

    ' Create an image v-object which represents the overlay image.
    Dim vOverlayImage As New Aurigma.GraphicsMill.WinControls.ImageVObject(overlayImage, False, 0, 0)

    ' Add the overlay v-object to a layer.
    VObjectsRubberband1.Layers(0).VObjects.Add(vOverlayImage)

End Sub

Private Sub _applyButton_Click(ByVal sender As System.Object, ByVal e As System.EventArgs) Handles _applyButton.Click, _applyButton.Click

    ' Render the overlay v-object to a bitmap.
    Dim renderedImage As Aurigma.GraphicsMill.Bitmap = VObjectsRubberband1.RenderWorkspace()

    ' Merge the overlay and background bitmaps.
    renderedImage.Draw(BitmapViewer1.Bitmap, 0, 0, BitmapViewer1.Bitmap.Width, _
        BitmapViewer1.Bitmap.Height, Aurigma.GraphicsMill.Transforms.CombineMode.Alpha, _
        1.0F, Aurigma.GraphicsMill.Transforms.InterpolationMode.HighQuality)

    ' Save the merged bitmap to file.
    BitmapViewer1.Bitmap.Save("..\..\imgNew.JPG")

    renderedImage.Dispose()

End Sub
namespace VObjectsSimpleCS
{
    public partial class Form1 : Form
    {
        string backgroundImageFilname = @"..\..\img1.JPG";
        string overlayImageFilename = @"..\..\img2.JPG";

        public Form1()
        {
            InitializeComponent();
        }

        private void Form1_Load(object sender, EventArgs e)
        {
            // Load the background and overlay bitmaps.
            Aurigma.GraphicsMill.Bitmap backgroundImage = new Aurigma.GraphicsMill.Bitmap(backgroundImageFilname);
            Aurigma.GraphicsMill.Bitmap overlayImage = new Aurigma.GraphicsMill.Bitmap(overlayImageFilename);

            // Load the backgroundImage to the BitmapViewer.
            bitmapViewer1.Bitmap = backgroundImage;

            // Create an image v-object which represents the overlay image.
            Aurigma.GraphicsMill.WinControls.ImageVObject vOverlayImage = new Aurigma.GraphicsMill.WinControls.ImageVObject(overlayImage, false, 0, 0);

            // Add the overlay v-object to a layer.
            vObjectsRubberband1.Layers[0].VObjects.Add(vOverlayImage);

        }

        private void _applyButton_Click(object sender, EventArgs e)
        {
            // Render the overlay v-object to a bitmap.
            Aurigma.GraphicsMill.Bitmap renderedImage = vObjectsRubberband1.RenderWorkspace();

            // Merge the overlay and background bitmaps.
            renderedImage.Draw(bitmapViewer1.Bitmap, 0, 0, bitmapViewer1.Bitmap.Width,
                bitmapViewer1.Bitmap.Height, Aurigma.GraphicsMill.Transforms.CombineMode.Alpha,
                1f, Aurigma.GraphicsMill.Transforms.InterpolationMode.HighQuality);

            // Save the merged bitmap to file.
            bitmapViewer1.Bitmap.Save(@"..\..\imgNew.JPG");

            renderedImage.Dispose();
        }
    }
}
Memory Friendly Approach
As mentioned above, the main advantage of the memory friendly approach is that it does not use much memory. To achieve this improvement we load resized copies of the background and overlay images to the BitmapViewer and ImageVObject correspondingly. The approach includes the following steps:
- Instantiate the BitmapViewer and VObjectsRubberband objects in the application.
- Assign the rubberband created on the previous step to the Rubberband property of the BitmapViewer instance. Find more detailed information about rubberbands in Using Navigators and Rubberbands (Windows Forms) topic.
- Load the background image and resize it down using the TransformsProvider.Resize method. In the code sample below the background image is resized proportionally to a doubled BitmapViewer's width. It allows improving the displaying quality.
- Load the overlay image and resize it down using TransformsProvider.Resize method. In the code sample the overlay image is resized proportionally to a half of the resized background image width.
- Load the resized background image to the BitmapViewer using the BitmapViewer.Bitmap property.
- Create the ImageVObject and load the resized overlay image to it.
- Add the overlay image v-object to the corresponding layer using the VObjectsRubberband.Layers property.
- Then users are able to change position of the overlay image on the background using mouse control; resize, rotate or skew it by dragging the corresponding grips.
- When all preparations are done, call the method which merges the overlay and background
images together and saves the result to a file. The implementation of this method consists of
three parts:
- Load originals of the background and overlay images and create the System.Drawing.Graphics based on the background image.
- Get all the user transformations applied to the resized overlay image and adapt them for use with the original one. These transformations are stored in the transformation matrix and can be gotten using the ImageVObject.Transform property (read the general information about transformation matrices in Affine and Projective Transformations topic). To adapt this matrix for full-size overlay image we should scale it with a special coefficient. The way how this coefficient is calculated is described in the comment lines of the code sample below.
- Set the System.Drawing.Graphics.Transform to the transformation matrix obtained from the previous step. Draw the original overlay image on the background image using this Graphics object.
The following code sample implements this approach:
Dim backgroundImageFilname As String = "..\..\img1.JPG"
Dim overlayImageFilename As String = "..\..\img2.JPG"

Private _imageScale As Single

Private Sub Form1_Load(ByVal sender As System.Object, ByVal e As System.EventArgs) Handles MyBase.Load

    ' Load the background image.
    Dim backgroundImageCopy As New Aurigma.GraphicsMill.Bitmap(backgroundImageFilname)

    ' Get an initial width of the background image.
    Dim backgroundWidth As Single = backgroundImageCopy.Width

    ' Resize the background image proportionally to a doubled BitmapViewer's width.
    backgroundImageCopy.Transforms.Resize(BitmapViewer1.Width * 2, 0)

    ' Get the ratio of the initial background image width to the current width.
    _imageScale = backgroundImageCopy.Width / backgroundWidth

    ' Load the overlay image.
    Dim overlayImageCopy As New Aurigma.GraphicsMill.Bitmap(overlayImageFilename)

    ' Resize the overlay image proportionally to a half of the resized background image width.
    overlayImageCopy.Transforms.Resize(backgroundImageCopy.Width / 2.0F, 0)

    ' Load the resized copy of the background image to the BitmapViewer.
    BitmapViewer1.Bitmap = backgroundImageCopy

    ' Create an image v-object which represents the resized copy of the overlay image.
    Dim vOverlayImage As New Aurigma.GraphicsMill.WinControls.ImageVObject(overlayImageCopy, False, 0, 0)

    ' Add the overlay v-object to a layer.
    VObjectsRubberband1.Layers(0).VObjects.Add(vOverlayImage)

End Sub

Private Sub _applyButton_Click(ByVal sender As System.Object, ByVal e As System.EventArgs) Handles ApplyButton.Click

    ' Load originals of the background and overlay bitmaps.
    Dim backgroundImageOriginal As New Aurigma.GraphicsMill.Bitmap(backgroundImageFilname)
    Dim overlayImageOriginal As New Aurigma.GraphicsMill.Bitmap(overlayImageFilename)

    ' Get the GDI+ Graphics for the background image.
    Dim backgroundGraphics As System.Drawing.Graphics = backgroundImageOriginal.GetGdiplusGraphics()

    ' Resize the overlay image proportionally to a half of the background image width.
    overlayImageOriginal.Transforms.Resize(backgroundImageOriginal.Width / 2.0F, 0)

    ' Get a matrix which contains all the transformations applied by a user to the overlay v-object.
    Dim transform As System.Drawing.Drawing2D.Matrix = VObjectsRubberband1.Layers(0).VObjects(0).Transform.Clone()

    ' Since this matrix contains transformations applied to the resized overlay image
    ' we should adapt it for use with the original overlay image.

    ' During the adaptation we should take into account the following:
    ' 1. The difference in sizes between the initial background image and the resized one.
    ' 2. The difference in coordinate spaces between v-objects and bitmaps: v-objects coordinates are measured
    '    in points but bitmap dimensions - in pixels.

    ' To translate pixels to points we should multiply the value in pixels by 72 and divide it by the current screen resolution.

    ' Get a current screen resolution.
    Dim screenDpi As Single = System.Drawing.Graphics.FromHwnd(IntPtr.Zero).DpiX
    ' Determine the pixels-to-points conversion coefficient.
    Dim pixelsToPoints As Single = 72 / screenDpi

    ' Multiply the _imageScale by the pixels-to-points conversion coefficient to get the scale factor of transformation matrix.
    Dim scale As Single = _imageScale * pixelsToPoints

    ' Adapt the transformation matrix.

    ' Apply scale factor to transformation matrix by prepending.
    transform.Scale(scale, scale, System.Drawing.Drawing2D.MatrixOrder.Prepend)
    ' Apply inversed scale factor to transformation matrix by appending.
    transform.Scale(1 / scale, 1 / scale, System.Drawing.Drawing2D.MatrixOrder.Append)

    ' Apply transformations.
    backgroundGraphics.Transform = transform
    ' Draw the overlay image on the background.
    backgroundGraphics.DrawImage(overlayImageOriginal, 0, 0, overlayImageOriginal.Width, overlayImageOriginal.Height)

    ' Save the merged bitmap to file.
    backgroundImageOriginal.Save("..\..\imgNew.JPG")

    backgroundImageOriginal.Dispose()
    overlayImageOriginal.Dispose()
    backgroundGraphics.Dispose()

End Sub
namespace VObjectsMemoryFriendlyCS
{
    public partial class Form1 : Form
    {
        string backgroundImageFilname = @"..\..\img1.JPG";
        string overlayImageFilename = @"..\..\img2.jpg";

        private float _imageScale;

        public Form1()
        {
            InitializeComponent();
        }

        private void Form1_Load(object sender, EventArgs e)
        {
            // Load the background image.
            Aurigma.GraphicsMill.Bitmap backgroundImageCopy = new Aurigma.GraphicsMill.Bitmap(backgroundImageFilname);

            // Get an initial width of the background image.
            float backgroundWidth = backgroundImageCopy.Width;

            // Resize the background image proportionally to a doubled BitmapViewer's width.
            backgroundImageCopy.Transforms.Resize(bitmapViewer1.Width * 2, 0);

            // Get the ratio of the initial background image width to the current width.
            _imageScale = backgroundImageCopy.Width / backgroundWidth;

            // Load the overlay image.
            Aurigma.GraphicsMill.Bitmap overlayImageCopy = new Aurigma.GraphicsMill.Bitmap(overlayImageFilename);

            // Resize the overlay image proportionally to a half of the resized background image width.
            overlayImageCopy.Transforms.Resize(backgroundImageCopy.Width / 2, 0);

            // Load the resized background image to the BitmapViewer.
            bitmapViewer1.Bitmap = backgroundImageCopy;

            // Create an image v-object which represents the resized overlay image.
            Aurigma.GraphicsMill.WinControls.ImageVObject vOverlayImage = new Aurigma.GraphicsMill.WinControls.ImageVObject(overlayImageCopy, false, 0, 0);

            // Add the overlay v-object to a layer.
            vObjectsRubberband1.Layers[0].VObjects.Add(vOverlayImage);
        }

        private void _applyButton_Click(object sender, EventArgs e)
        {
            // Load originals of the background and overlay bitmaps.
            Aurigma.GraphicsMill.Bitmap backgroundImageOriginal = new Aurigma.GraphicsMill.Bitmap(backgroundImageFilname);
            Aurigma.GraphicsMill.Bitmap overlayImageOriginal = new Aurigma.GraphicsMill.Bitmap(overlayImageFilename);

            // Get the GDI+ Graphics for the background image.
            System.Drawing.Graphics backgroundGraphics = backgroundImageOriginal.GetGdiplusGraphics();

            // Resize the overlay image proportionally to a half of the background image width.
            overlayImageOriginal.Transforms.Resize(backgroundImageOriginal.Width / 2, 0);

            // Get a matrix which contains all the transformations applied by a user to the overlay v-object.
            System.Drawing.Drawing2D.Matrix transform = vObjectsRubberband1.Layers[0].VObjects[0].Transform.Clone();

            // Since this matrix contains transformations applied to the resized overlay image
            // we should adapt it for use with the original overlay image.

            // During the adaptation we should take into account the following:
            // 1. The difference in sizes between the initial background image and the resized one.
            // 2. The difference in coordinate spaces between v-objects and bitmaps: v-objects coordinates are measured
            //    in points but bitmap dimensions - in pixels.

            // To translate pixels to points we should multiply the value in pixels by 72 and divide it by the current screen resolution.

            // Get a current screen resolution.
            float screenDpi = System.Drawing.Graphics.FromHwnd(IntPtr.Zero).DpiX;
            // Determine the pixels-to-points conversion coefficient.
            float pixelsToPoints = 72 / screenDpi;

            // Multiply the _imageScale by the pixels-to-points conversion coefficient to get the scale factor of transformation matrix.
            float scale = _imageScale * pixelsToPoints;

            // Adapt the transformation matrix.

            // Apply scale factor to transformation matrix by prepending.
            transform.Scale(scale, scale, System.Drawing.Drawing2D.MatrixOrder.Prepend);
            // Apply inversed scale factor to transformation matrix by appending.
            transform.Scale(1 / scale, 1 / scale, System.Drawing.Drawing2D.MatrixOrder.Append);

            // Merge the original overlay and background images using the adapted transformation matrix.

            // Apply transformations.
            backgroundGraphics.Transform = transform;
            // Draw the overlay image on the background.
            backgroundGraphics.DrawImage(overlayImageOriginal, 0, 0, overlayImageOriginal.Width, overlayImageOriginal.Height);

            // Save the merged bitmap to file.
            backgroundImageOriginal.Save(@"..\..\imgNew.JPG");

            backgroundImageOriginal.Dispose();
            overlayImageOriginal.Dispose();
            backgroundGraphics.Dispose();

        }
    }
}
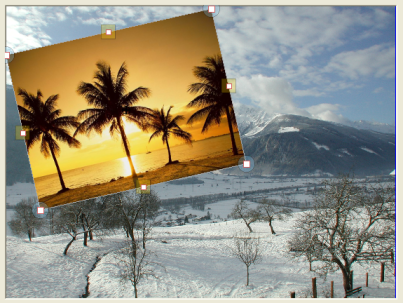
User interface provided by these approaches looks like the following screenshot. It shows how you can apply transformations to overlay image using grips.
See Also
Reference
- BitmapViewer Class
- VObjectsRubberband Class
- ViewerBase.Rubberband Property
- VObjectsRubberband.RenderWorkspace Overload
- Bitmap.Draw Overload
- TransformsProvider.Resize Overload
- System.Drawing.Drawing2D.Matrix