Resizing and Cropping Images
Image resizing and cropping are the most popular image processing operations. As you know, Graphics Mill provides two ways to perform geometrical raster transformations: in-place and out-of-place. This article describes both approaches to performing resizing and cropping and provides code snippets.
Let us examine both operations in more detail.
If you want to resize images in order to get image thumbnails, we recommend you view the EXIF and IPTC Metadata topic.
Resizing Images
As usual for resizing operations, you can specify width and height of the resulting image. By default, Graphics Mill stretches and shrinks the image to fit the specified dimensions. However, if you specify only one dimension (width or height) and the other is passed as a zero, the aspect ratio of the original bitmap will be preserved. Another way to preserve the aspect ratio is to pass both dimensions and specify a value (ResizeMode enumeration) indicating how to apply the values:
- Resize. Width and height specify dimensions of the image after resize (proportions are not preserved). This is a default mode.
- Fit. Width and height specify a rectangle the image is inscribed into (image proportions are preserved).
- Shrink. The same as Fit, but the resize occurs only if width and height are smaller than image dimensions.
- ImageFill. In this mode image is proportionally resized and cropped. Firstly, the image is resized so that the given rectangle is inscribed into the resized image. After that the rectangle is centered on the resized image and the image is cropped by the rectangle bounds.
Quality and speed of the resizing depends on the interpolation mode used. Better quality means slower speed. The ResizeInterpolationMode enumeration exposes the available interpolation modes, including High, Medium, and Low. To get more information about interpolation modes read the Interpolation Modes Comparison topic.
The following code proportionally resizes an image to 100 pixel width using the Bitmap.Transforms property:
using (var bitmap = new Bitmap(@"Images\in.jpg"))
{

    bitmap.Transforms.Resize(100, 0);
    bitmap.Save(@"Images\Output\out.jpg");
}
The following does the same as the previous snippet, but uses the Transforms.Resize class:
using (var bitmap = new Bitmap(@"Images\in.jpg"))
using (var resize = new Resize(100, 0))
{
    using (var result = resize.Apply(bitmap))
    {
        result.Save(@"Images\Output\out.jpg");
    }
}
The following code proportionally resizes an image to 100 pixel width using the Bitmap.Transforms property. The interpolation mode is set to high quality:
using (var bitmap = new Bitmap(@"Images\in.jpg"))
{
    bitmap.Transforms.Resize(100, 0, ResizeInterpolationMode.High, ResizeMode.Fit);
    bitmap.Save(@"Images\Output\out.jpg");
}
The following code does the same as the previous snippet, but uses the Transforms.Resize class:
using (var bitmap = new Bitmap(@"Images\in.jpg"))
using (var resize = new Resize(100, 100))
{
    resize.InterpolationMode = ResizeInterpolationMode.High;
    resize.ResizeMode = ResizeMode.Fit;
    using (var result = resize.Apply(bitmap))
        result.Save(@"Images\Output\out.jpg");
}
Photoshop-like Resizing
You may notice that images resized using Photoshop and using Graphics Mill are slightly different. It seems that Photoshop sharps edges during the resizing. You can get the get the result close to Photoshop by implementing the Transforms.UnsharpMask transformation to the resized image:
using (var bitmap = new Bitmap(@"Images\in.jpg"))
{
    bitmap.Transforms.Resize(1400, 933, ResizeInterpolationMode.Lanczos3);
    bitmap.Transforms.UnsharpMask(0.35f, 1f, 0f);
    bitmap.Save(@"Images\Output\out.jpg");
}
Resizing JPEG Images
When you resize a JPEG image you can use the JpegReader.Scale property to speed it up. This setting allows downscaling the image 2, 4, or 8 times while decoding it and it works several times faster than conventional image resize operation. Following this idea, you can combine usage of the JpegReader.Scale property and the image resize operation to achieve a higher speed. The code snippet below does the same as the previous snippets - proportionally resizes images to 100 pixel width. However it downscales the image before applying the resize operation and it works two times faster than the previous snippets.
int width = 100;
int height = 100;

using (var reader = new JpegReader(@"Images\in.jpg"))
{
    float ratio = Math.Min(1, Math.Min((float)width / reader.Width, (float)height / reader.Height));
    if (ratio > 0.5)
        reader.Scale = JpegScale.x1;
    else if (ratio > 0.25)
        reader.Scale = JpegScale.x2;
    else if (ratio > 0.125)
        reader.Scale = JpegScale.x4;
    else
        reader.Scale = JpegScale.x8;

    using (var bitmap = reader.Frames[0].GetBitmap())
    {
        bitmap.Transforms.Resize(width, height, ResizeInterpolationMode.High, ResizeMode.Fit);
        bitmap.Save(@"Images\Output\out.jpg");
    }
}
Cropping Images
Cropping requires you to define a crop rectangle as the input parameter. The rectangle can be set as four System.Int32 values: x and y coordinates of the upper left rectangle corner, rectangle width, and rectangle height. Or you can set the rectangle as a Rectangle instance.
The following code crops a 50*100 pixel rectangle from an image and saves the result in JPEG format. The code uses the Bitmap.Transforms property to crop an image:
using (var bitmap = new Bitmap(@"Images\in.jpg"))
{
    bitmap.Transforms.Crop(50, 60, 50, 100);
    bitmap.Save(@"Images\Output\out.jpg");
}
The following code crops a 50*100 pixel rectangle from an image and saves the result in JPEG format. The code uses the Transforms.Crop class to crop an image and a Rectangle instance to set the cropping rectangle:
using (var bitmap = new Bitmap(@"Images\in.jpg"))
{
    var cropRectangle = new System.Drawing.Rectangle(50, 60, 50, 100);

    using (var crop = new Crop(cropRectangle))
    using (var result = crop.Apply(bitmap))
        result.Save(@"Images\Output\out.jpg");
}
Auto Cropping Images
Graphics Mill provides the AutoCrop class (and the TransformsProvider.AutoCrop(Color) method, respectively) which removes borders around images in the automatic mode. When cropping images automatically you don't need to specify a crop rectangle. All you need is just to initialize AutoCrop.#ctor (or set the first parameter of the TransformsProvider.AutoCrop(Color, Single) method) with the color of a border around the image (the default value is white) and apply it to the bitmap.
If an image border consist of several colors, you can specify sensitivity of the auto crop algorithm using the Threshold property (or the second argument of the TransformsProvider.AutoCrop(Color, Single) method). The higher the value the more color will be cropped.
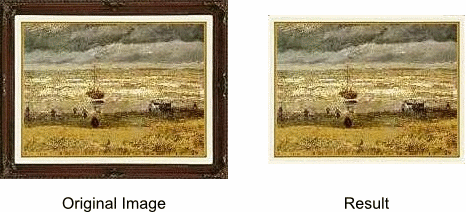
The following code example uses the AutoCrop class to remove a wooden frame:
using (var bitmap = new Bitmap(@"Images\in.jpg"))
using (var autoCrop = new AutoCrop(RgbColor.Brown))
{
    autoCrop.Threshold = 0.7f;
    using (var result = autoCrop.Apply(bitmap))
        result.Save(@"Images\Output\out.jpg");
}
The picture below shows the result of this snippet:
Here is the same example using the AutoCrop(Color, Single) method:
using (var bitmap = new Bitmap(@"Images\in.jpg"))
{
    bitmap.Transforms.AutoCrop(RgbColor.Brown, 0.7f);
    bitmap.Save(@"Images\Output\out.jpg");
}
See Also
Reference
- Bitmap.Transforms Property
- Transforms.Resize Class
- TransformsProvider.Resize Overload
- Transforms.ResizeMode Class
- Transforms.ResizeInterpolationMode Class
- Transforms.Crop Class
- TransformsProvider.Crop Overload
- TransformsProvider.AutoCrop(Color, Single) Method