- About Graphics Mill
- What's New?
- Breaking Changes in Graphics Mill 12
- Breaking Changes in Graphics Mill 11
- Features
- Supported File Formats
- System Requirements
- Getting Started
- Working with Image Formats
- Transforming Images (Resize, Rotate, Crop)
- Working with Metadata
- Color Management and Color Reduction
- Drawing Text and Graphics
- Color Keying (Green Screen Removal)
- Channels and Pixel Data
- Color and Tone Correction
- Working with Photoshop (PSD) Files
- Image Filters
- Processing Large Images
- Basics of Image Processing
- Troubleshooting
- Class Library Reference
- Licensing
- End User License Agreement
- Copyright Notices
Working with EPS
Encapsulated PostScript (EPS) is a PostScript document that is used as a graphics file format. An EPS file may contain both raster and vector data described with the PostScript language.
Graphics Mill provides two ways to create EPS documents: using the Bitmap and EpsWriter classes. Graphics Mill does not provide a full EPS processor, but it can read TIFF previews if any. To read a TIFF preview, you can use the EpsReader class. This topic describes these EPS features.
Using Bitmaps
Using a Bitmap is the simplest way to create EPS documents. All you need to do is create a Bitmap, draw graphics on it, and save it as an EPS using the Bitmap.Save method. The following snippet illustrates how to do this:
using (var bitmap = new Bitmap(200, 80, PixelFormat.Format24bppRgb, RgbColor.White))
using (var graphics = bitmap.GetGraphics())
{
    var plainText = new PlainText("Plain Text", graphics.CreateFont("Arial", 28), new System.Drawing.PointF(20, 40));
    graphics.DrawText(plainText);
    bitmap.Save(@"Images\Output\out.eps", new EpsSettings(CompressionType.Jpeg, 90));
}
Notice that Bitmap.Save allows you to choose an algorithm for the bitmap compression and its quality.
Using EpsWriter
EpsWriter is the more flexible way to create EPS documents. Using this class, you can create an EPS containing raster images and vector shapes. You can also draw vector text, which has advantages over raster - it scales without diminishing quality. All drawing on the EPS is performed via Graphics, which is returned by the EpsWriter.GetGraphics() method. To learn how to draw on Graphics in detail, read the Drawing section. Here is the snippet demonstrating how to create EpsWriter with the specified size and DPI, and then get the Graphics from it that are necessary for drawing:
var dpi = 300f;
using (var epsWriter = new EpsWriter(@"Images\Output\out.eps", 500, 500, dpi, dpi))
using (var graphics = epsWriter.GetGraphics())
{
    //...
}
EpsWriter does not allow for specifying a color space or color profile for the resulting document. Each graphic element drawn on the EPS has its own color space, and it may contain a color profile. This allows for drawing graphic elements with different pixel formats on the same document. For instance, if you draw an RGB bitmap with an sRGB color profile and delineate it with a CMYK rectangle, both of these elements will be displayed correctly according to their color spaces and the image will be stored with an embedded sRGB color profile:
using (var epsWriter = new EpsWriter(@"Images\Output\out.eps", 210, 160))
using (var graphics = epsWriter.GetGraphics())
{
    //Draw the RGB bitmap with an sRGB color profile.
    using (var bitmap = new Bitmap(@"Images\RgbImage.jpg"))
    {
        //Assign a standard sRGB profile.
        bitmap.ColorProfile = ColorProfile.FromSrgb();
        graphics.DrawImage(bitmap, 10, 10);
    }
    //Draw the CMYK rectangle.
    graphics.DrawRectangle(new Pen(new CmykColor(43, 65, 92, 44), 4), 9, 9, 190, 141);
}
Here is the result of this snippet:
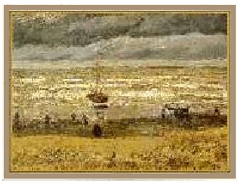
When creating the EPS, you may need to work with device independent coordinates (for example, inches) instead of pixels. However, all constructors of EpsWriter will only accept the EPS size in pixels. In this case, you can use the UnitConverter.ConvertUnitsToPixels(Single, Single, Unit) method that converts inches to pixels according to the given DPI. Assume that we need to create 3.5"x2.5" EPS with 300 DPI. Here is the snippet showing how to do this:
var epsDPI = 300f;
using (var epsWriter = new EpsWriter(@"Images\out.eps", UnitConverter.ConvertUnitsToPixels(dpi, 3.5f, Unit.Inch),
        UnitConverter.ConvertUnitsToPixels(dpi, 2.0f, Unit.Inch), epsDPI, epsDPI))
using (var graphics = epsWriter.GetGraphics())
{
    //...
}
An image drawn on an EPS document may have an alpha channel specifying an opacity degree for each pixel.
However, the EPS format cannot handle semi-transparency, that is, each pixel in EPS images can only be displayed with full opacity or full transparency.
EpsWriter allows you to specify a threshold for transparency via
the AlphaThreshold property.
AlphaThreshold values are accepted in the range [0, 1].
If a pixel's alpha value is greater than the AlphaThreshold,
the pixel will be fully opaque; otherwise, it will be fully transparent.
Let us assume that we have a picture with a transparent frame produced by the snippet below:
using (var bitmap = new Bitmap(200, 151, PixelFormat.Format32bppArgb, new RgbColor(255, 255, 255, 20)))
using (var graphics = bitmap.GetGraphics())
{
    graphics.DrawImage(new Bitmap(@"Images\RgbImage.jpg"), new System.Drawing.RectangleF(8, 8, 184, 136));
    //Draw a rectangle with transparency.
    var pen = new Pen(new RgbColor(0, 88, 0, 150), 8);
    graphics.DrawRectangle(pen, 4, 4, 192, 143);

    bitmap.Save(@"Images\Output\out.png");
}
Now we need to draw this image on the EPS. If we specify the AlphaThreshold property at 0.7,
which is greater than the frame transparency, then the frame will be invisible as the following image illustrates:
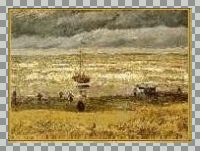
This image was produced by the snippet below:
using (var epsWriter = new EpsWriter(@"Images\Output\out.eps", 200, 151))
{
    epsWriter.AlphaThreshold = 0.7f;
    using (var graphics = epsWriter.GetGraphics())
        graphics.DrawImage(new Bitmap(@"Images\Output\out.png"), new System.Drawing.RectangleF(0, 0, 200, 151));
}
If we specify AlphaThreshold at 0.5,
which is smaller than the frame transparency, then the frame will be opaque:

Reading TIFF Preview
Graphics Mill allows you to read TIFF previews from EPS files. The following example shows how you can read a TIFF preview and save it into a PNG file using memory-friendly Pipeline API.
using (var reader = new EpsReader(@"Images\seal.eps"))
using (var writer = new PngWriter(@"Images\Output\out.png"))
{
    Pipeline.Run(reader + writer);
}
See Also
Reference
- Bitmap Class
- EpsWriter Class
- UnitConverter Class
- UnitConverter.ConvertUnitsToPixels(Single, Single, Unit) Method
- Pipeline Class