This documentation is for the old version. Go to the latest Graphics Mill docs
Adding ThumbnailListView Control to Application
This topic contains information on how to get started with the ThumbnailListView control.
- Create a new Windows Forms application in Visual Studio: on the File menu choose New and click Project.
- Add the ThumbnailListView
control to the toolbox:
- Right-click the component toolbox and click Choose Items. This will open the Choose Toolbox Items dialog.
- Find the ThumbnailListView component on the .NET Framework Components tab. If, for some reason, you cannot find this component, click the Browse button and select the Aurigma.GraphicsMill.WinControls.dll assembly. Then, choose the ThumbnailListView component as described above.
- In the Toolbox, find the
 ThubmnailListView
item and drag it to the form.
ThubmnailListView
item and drag it to the form. - Add the code which will fill the list with items. For example, the following code snippet will
insert two items which for files file1.jpg and file2.jpg:
Visual BasicThumbnailListView1.Items.Add( _ New Aurigma.GraphicsMill.WinControls.ThumbnailListItem("C:\file1.jpg")) ThumbnailListView1.Items.Add( _ New Aurigma.GraphicsMill.WinControls.ThumbnailListItem("C:\file2.jpg"))C#thumbnailListView1.Items.Add( new Aurigma.GraphicsMill.WinControls.ThumbnailListItem(@"C:\file1.jpg")); thumbnailListView1.Items.Add( new Aurigma.GraphicsMill.WinControls.ThumbnailListItem(@"C:\file2.jpg")); - Run the application. You will see something like this:
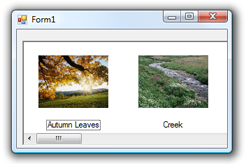
Fig. 1. Simple application that uses the ThumbnailListView control
This is a very basic example which does not demonstrate all features of the ThumbnailListView control. More detailed code example is described in the Using the ThumbnailListView Control as a File Browser topic.