Setting Up the Details View
The ThumbnailListView control can display items not only as thumbnails. It supports four view modes which can be specified using the VirtualListView.View property: thumbnails, icons, simple list, and detailed list.
In the first three modes only graphical representation of items is used, plus a title is shown. The fourth mode allows displaying more information. Items in the detailed view are displayed as rows of a table. Columns can contain any textual information associated with the items. Small icons are displayed in the first column. For example, if you display files, for each item you may want to display file name, size, and creation date.
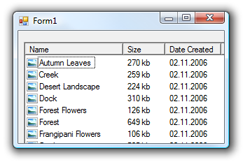
Fig. 1. Detailed list view mode
Each kind of textual information (for example, file name or size) is identified with an integer number called TextInfoId. These IDs are used to associate a column with data that should be displayed. For the standard list item implementation (the ThumbnailListItem class) the following values are supported:
| Name | Value | Description |
|---|---|---|
| TextInfoIdDisplayName | 0 | File name (which is displayed as a caption for items in other view modes) |
| TextInfoIdFileSize | 1 | File size |
| TextInfoIdFileType | 2 | File type |
| TextInfoIdCreationDate | 3 | File creation date |
| TextInfoIdPath | 4 | Full path to a file |
If you implement custom list items, you can use any other values to display necessary details in the table.
Before you start using this view mode, you should configure the columns. You can do it both in design time and run-time.
Configure Columns in Design Time
To configure columns in design time, follow these steps:
- Right-click the ThumbnailListView control on the form.
- Click the Properties menu item.
- Choose the Columns property and click the button with ellipsis.
- When a dialog appears, click the Add button.
- Edit column properties in the grid (the right panel):
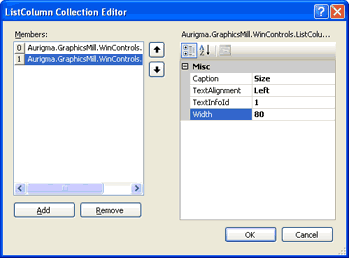
Fig. 2. Configuring columns in design time - Click OK.
Configure Columns in Run-Time
If you need to manipulate columns in run-time (for example, if you want tp let the user show and hide columns), you can do it using the ThumbnailListView.Columns property. It is a collection of ListColumn objects that can be added or removed from this collection.
For example, the following code snippet adds the same columns as displayed on the screenshot above.
' File name column.
thumbnailListView1.Columns.Add( _
 New Aurigma.GraphicsMill.WinControls.ListColumn( _
  Aurigma.GraphicsMill.WinControls.ThumbnailListItem.TextInfoIdDisplayName, _
  "Name", 140, System.Windows.Forms.HorizontalAlignment.Left))

' File size column.
thumbnailListView1.Columns.Add( _
 New Aurigma.GraphicsMill.WinControls.ListColumn( _
  Aurigma.GraphicsMill.WinControls.ThumbnailListItem.TextInfoIdFileSize, _
  "Size", 60, System.Windows.Forms.HorizontalAlignment.Left))

' File creation date column.
thumbnailListView1.Columns.Add( _
 New Aurigma.GraphicsMill.WinControls.ListColumn( _
  Aurigma.GraphicsMill.WinControls.ThumbnailListItem.TextInfoIdCreationDate, _
  "Date Created", 80, System.Windows.Forms.HorizontalAlignment.Left))
// File name column.
thumbnailListView1.Columns.Add(
    new Aurigma.GraphicsMill.WinControls.ListColumn(
        Aurigma.GraphicsMill.WinControls.ThumbnailListItem.TextInfoIdDisplayName,
        "Name", 140, System.Windows.Forms.HorizontalAlignment.Left));

// File size column.
thumbnailListView1.Columns.Add(
    new Aurigma.GraphicsMill.WinControls.ListColumn(
        Aurigma.GraphicsMill.WinControls.ThumbnailListItem.TextInfoIdFileSize,
        "Size", 60, System.Windows.Forms.HorizontalAlignment.Left));

// File creation date column.
thumbnailListView1.Columns.Add(
    new Aurigma.GraphicsMill.WinControls.ListColumn(
        Aurigma.GraphicsMill.WinControls.ThumbnailListItem.TextInfoIdCreationDate,
        "Date Created", 80, System.Windows.Forms.HorizontalAlignment.Left));