Understanding of JPEG Encoding Parameters
JPEG is a lossy compression algorithm based on imperfections of the human vision. It exchanges the image quality for smaller file size. This article describes how the ratio between image quality and file size can be adjusted and used in different application fields. We will consider the main aspects of the JPEG compression algorithm in general and how the JPEG encoding options are implemented in Graphics Mill.
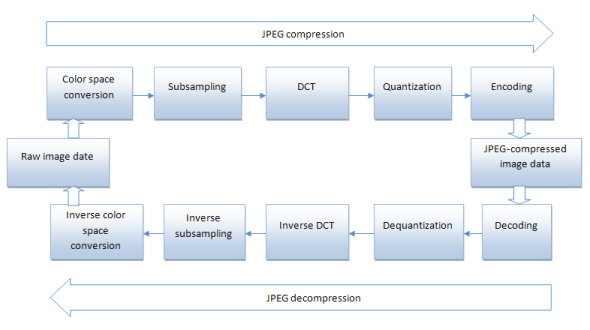
JPEG Compression Algorithm
In the general case, the JPEG compression algorithm includes the following steps:
- Color space conversion;
- Chroma subsampling;
- Segmentation into blocks;
- Discrete Cosine Transform;
- Quantization;
- Encoding.
The decompression process consists of all these steps but uses them in the inverse order. The figure below demonstrates the JPEG compression-decompression cycle:
Color Space Conversion
On this step the colors of the RGB (Red, Green, Blue) image are converted to YCbCr (Luminance, Chrominance Blue, Chrominance Red). During this conversion we take three standard channels (RGB) and convert them into a different representation which is based on a luminance (brightness) channel and two opposing color channels. These three channels are typically less interdependent then the RGB channels. That allows us to store them with different resolution. If the image is CMYK or grayscale, it is processed without any color conversion.
Chroma Subsampling
It is widely known that we are much more sensitive to changes in luminance than in chrominance. It means that we may neglect larger changes in the chrominance without affecting our perception of the image. Therefore, we can store the color information at lower resolution than the luminance information. This method can be applied only to images in YCbCr color space. CMYK images use all the channels to store color information. Therefore each color channel is compressed and quantized with the similar quality. Grayscale images have no color information and do not need being converted. Graphics Mill provides a functionality to change chrominance resolution during the compression. Read more about this encoder option in the Chroma subsampling section of this article.
Segmentation into Blocks
The image is divided into 8 by 8 blocks of pixels. Since each block is processed without reference to the others, further steps will be described relatively to a single block.
Discrete Cosine Transform
Each of the color component data (e.g. Y, Cb, Cr for YCbCr or C, M, Y, K for CMYK) undergoes the Discrete Cosine Transform (DCT). The DCT is similar to the Fourier Transform in the sense that it produces a kind of a spatial frequency spectrum.
Quantization
The amplitudes of the frequency components are quantized. The human vision is much more sensitive to small variations in color or brightness over large areas (low-frequency components) than to variations which occur on every pixel (high-frequency components). Therefore, the high-frequency components are stored with a lower accuracy than the low-frequency ones. The quality setting of the encoder affects the resolution of each frequency component. Higher values of quality setting correspond to higher quality images and larger file sizes. The Quality section of this article describes how this setting can be adjusted in Graphics Mill.
Encoding
The resulting data for all 8 by 8 blocks of pixels is compressed with a lossless algorithm, a variant of Huffman encoding.
Graphics Mill JPEG Encoder Options
Chroma Subsampling
Graphics Mill allows performing 2x2 chroma subsampling and provides JpegEncoderOptions.ChromaSubsamplingEnabled and JpegFrame.ChromaSubsamplingEnabled properties to specify whether this method is used during the compression.
- If these properties are set to
true2x2 chroma subsampling is used. In that case, the image is divided into 2x2 pixel blocks and only the average color information for each block is stored. Graphics Mill applies chroma subsampling to RGB images only, which are automatically converted to YCrCb during the compression. - If these properties are set to
falsechroma subsampling is not used.
The default value of these properties is true.
Using 2x2 chroma subsampling produces good quality and compression results for high-resolution landscapes, portraits, and other images with general details. On the other hand, turning chroma subsampling off is more suitable for low-resolution web images with fine details, like text over a uniform background or flat-color images.
The fact that this method is based on the limitations of the human eye means that it is not a particularly good mechanism for compressing images which will be used by other "sensors", where the chrominance is equally important as the luminance.
Quality
Basically, this encoder option affects the image quality and its file size. The less quality, the less file size. In other words, the quality setting determines the required bit count per one pixel of the compressed image. This setting ranges from 1 to 100, the value 100 means no quantization. But remember, absence of the quantization does not mean absence of loss.
The proper setting for this parameter depends on the image quality or file size you want to obtain. You may decrease this setting for high-resolution images with not many fine details to obtain the less file size. But you should enlarge it for web images which are generally have a low resolution and contain some portions with fine details. Anyway, you will get the best ratios with 50-85 of image quality setting.
In Graphics Mill the quality setting can be specified using the JpegEncoderOptions.Quality or JpegFrame.Quality property. This value ranges from 1 to 100 and equals to 75 by default.
Progressive JPEG
Besides the considered encoding options Graphics Mill allows saving image as a progressive JPEG. Progressive JPEG is very useful for web and differs from simple JPEG in the following.
A simple JPEG file is stored as one top-to-bottom scan of the image. Progressive JPEG divides the file into a series of scans. The first scan shows the image at the equivalent of a very low quality setting, and therefore it takes very little space. Following scans gradually improve the quality. Each scan is added to the data already provided, so that the total storage requirement is roughly the same as for a simple JPEG image of the same quality as the final scan. (Basically, progressive JPEG is just a rearrangement of the same data into a more complicated order.) The advantage of progressive JPEG is that an image is viewed on-the-fly as it is transmitted; one can see an approximation to the whole image very quickly, with gradual improvement of quality as one waits longer. This is much nicer than a slow top-to-bottom display of the image.
The disadvantages of this method are:
- The each scan takes about the same amount of computation to display as a whole simple JPEG file would.
- The decoder requires a buffer for all the partial (and final) scans.
This functionality is disabled in Graphics Mill by default. To turn it on
just set the JpegEncoderOptions.IsProgressive or
JpegFrame.IsProgressive property to true.
Examples
The following code samples demonstrate how to save JPEG file with non-default encoder settings. Both examples set the quality setting to 90, make JPEG to be progressive and disable chroma subsampling.
The first example uses the Save method of the Bitmap class to save file and the JpegEncoderOptions class to set non-default encoder options.
Dim bitmap As New Aurigma.GraphicsMill.Bitmap("c:\Mountain.jpg")

bitmap.Save("C:\Mountain2.jpg", _
    New Aurigma.GraphicsMill.Codecs.JpegEncoderOptions(90, True, False))

bitmap.Dispose()
using (Aurigma.GraphicsMill.Bitmap bitmap =
    new Aurigma.GraphicsMill.Bitmap(@"c:\Mountain.jpg"))
{
        bitmap.Save(@"C:\Mountain2.jpg",
            new Aurigma.GraphicsMill.Codecs.JpegEncoderOptions(90, true, false));
}
The second code sample uses the JpegWriter and JpegFrame classes to implement the similar functionality.
Dim bitmap As New Aurigma.GraphicsMill.Bitmap("c:\Mountain.jpg")

Dim writer As New Aurigma.GraphicsMill.Codecs.JpegWriter("C:\Mountain2.jpg")

Dim frame As New Aurigma.GraphicsMill.Codecs.JpegFrame
frame.Quality = 90
frame.IsProgressive = True
frame.ChromaSubsamplingEnabled = False
frame.SetBitmap(bitmap)

bitmap.Dispose()

writer.AddFrame(frame)

frame.Dispose()

writer.Dispose()
using (Aurigma.GraphicsMill.Bitmap bitmap =
    new Aurigma.GraphicsMill.Bitmap(@"c:\Mountain.jpg"))
{
    using (Aurigma.GraphicsMill.Codecs.JpegWriter writer =
        new Aurigma.GraphicsMill.Codecs.JpegWriter(@"C:\Mountain2.jpg"))
    {

        using (Aurigma.GraphicsMill.Codecs.JpegFrame frame =
            new Aurigma.GraphicsMill.Codecs.JpegFrame())
        {
            frame.Quality = 90;
            frame.IsProgressive = true;
            frame.ChromaSubsamplingEnabled = false;
            frame.SetBitmap(bitmap);

            writer.AddFrame(frame);
        }
    }
}