Applying Lossless JPEG Transforms
When processing JPEG files, the problem of image quality loss may occur. The problem lies in the lossy nature of the JPEG compression algorithm. If you open JPEG file, and then save it back to JPEG several times, image quality degrades because of superposition of JPEG artifacts.
Fortunately for certain JPEG-processing operations it is possible to skip decoding-encoding step and apply these operations directly on compressed JPEG data. This topic discusses what lossless JPEG operations can be done using Graphics Mill for .NET and how to do it.
All functionality related to lossless JPEG transformations in Graphics Mill for .NET are encapsulated in the Aurigma.GraphicsMill.Codecs.LosslessJpegTransform class. To use this class you need to open a JPEG file (using the LosslessJpegTransform.Open method). After that you call one of WriteXXX methods, corresponding to an opertaion you want to perform. Let's see it in action.
Lossless Rotate and Flip
The simplest operation on JPEG which can be done without recompression is 90-degree rotation. To rotate a JPEG file, just use the LosslessJpegTransform.WriteRotated method as demonstrated here:
Dim losslessJpeg As New Aurigma.GraphicsMill.Codecs.LosslessJpegTransform("C:\mountain.jpg")

losslessJpeg.WriteRotated("C:\mountain2.jpg", System.Drawing.RotateFlipType.Rotate90FlipNone)

losslessJpeg.Close()
Aurigma.GraphicsMill.Codecs.LosslessJpegTransform losslessJpeg =
    new Aurigma.GraphicsMill.Codecs.LosslessJpegTransform(@"C:\mountain.jpg");

losslessJpeg.WriteRotated(@"C:\mountain2.jpg", System.Drawing.RotateFlipType.Rotate90FlipNone);

losslessJpeg.Close();
You can not only rotate the JPEG file this way, but also flip it horizontally or vertically. Just pass appropriate System.Drawing.RotateFlipType value:
Dim losslessJpeg As New Aurigma.GraphicsMill.Codecs.LosslessJpegTransform("C:\mountain.jpg")

losslessJpeg.WriteRotated("C:\mountain2.jpg", System.Drawing.RotateFlipType.RotateNoneFlipX)

losslessJpeg.Close()
Aurigma.GraphicsMill.Codecs.LosslessJpegTransform losslessJpeg =
    new Aurigma.GraphicsMill.Codecs.LosslessJpegTransform(@"C:\mountain.jpg");

losslessJpeg.WriteRotated(@"C:\mountain2.jpg", System.Drawing.RotateFlipType.RotateNoneFlipX);

losslessJpeg.Close();
According to JPEG specification an image is represented by blocks of pixels so-called JPEG Minimum Coded Units (MCU). Typically MCU size is a number divisible by 8. That fact allows to peform lossless rotation or flip: MCU blocks are rearranged in new order as well as the order of pixels is changed inside each MCU. Examine the situation when width or height of an image is non-divisible by MCU size, it means that the last column or row contains partially-filled MCU blocks. Such images do not support some types of rotation and flip. They will be cropped during tranformation and width and height of the result image will be divisible by MCU size. If you need to know whether dimensions of your image will be changed after a transformation, you can use the LosslessJpegTransform.IsTrimmingRequired(RotateFlipType) method. This method returns whether dimensions will be changed taking into account the dimensions of the currently opened JPEG image and the desired type of transformation.
Lossless Crop
Another interesting feature of the LosslessJpegTransform class is an ability to crop a part of JPEG file. In addition to elimitating JPEG quality loss, a benefit of this kind of crop against common approach (when you load a bitmap into memory and use the Crop transform) is higher speed and less memory consumption. You save CPU resources by skipping JPEG decompression and do not waste memory for unnecessary pixels which will be cropped out.
To crop a JPEG image in this way, use the LosslessJpegTransform.WriteCropped method as follows:
Dim losslessJpeg As New Aurigma.GraphicsMill.Codecs.LosslessJpegTransform("C:\mountain.jpg")

losslessJpeg.WriteCropped("C:\mountain2.jpg", New System.Drawing.Rectangle(64, 40, 157, 117))

losslessJpeg.Close()
Aurigma.GraphicsMill.Codecs.LosslessJpegTransform losslessJpeg =
    new Aurigma.GraphicsMill.Codecs.LosslessJpegTransform(@"C:\mountain.jpg");

losslessJpeg.WriteCropped(@"C:\mountain2.jpg", new System.Drawing.Rectangle(64, 40, 157, 117));

losslessJpeg.Close();
Partial JPEG Recompression
Graphics Mill for .NET allows not only to crop a part of JPEG image, but also a contrary operation - "patch" a part of JPEG image by drawing some bitmap on a JPEG (only this bitmap will be compressed, other JPEG data will remain untouched). It can be done via the LosslessJpegTransform.WritePatched method.
If we combine lossless crop with JPEG patching, we can easily apply any Graphics Mill effect on a part of JPEG image and recompress only this part. It is extremely useful when you change only small part of the image - for example when you put a logo, remove red eyes, etc.
One of tasks when it is necessary is hiding some portions of image by blurring it or adding a mosaic effect on it. For example, it is widely used when publishing car photos in the web to hide car numbers:
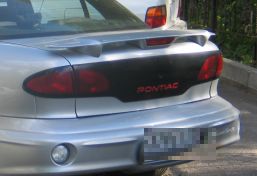
Let's see how it can be done:
Dim rect As New System.Drawing.Rectangle(152, 136, 72, 32)

'Apply mosaic effect on bitmap region
Dim mosaicBitmap As New Aurigma.GraphicsMill.Bitmap("C:\car.jpg")

mosaicBitmap.Transforms.Crop(rect)

mosaicBitmap.Transforms.Mosaic(4, 4)

'Save patched JPEG
Dim losslessJpeg As New Aurigma.GraphicsMill.Codecs.LosslessJpegTransform("C:\car.jpg")

losslessJpeg.WritePatched("C:\car2.jpg", rect.Location, mosaicBitmap)

losslessJpeg.Close()
System.Drawing.Rectangle rect =
    new System.Drawing.Rectangle(152, 136, 72, 32);

//Apply mosaic effect on bitmap region
Aurigma.GraphicsMill.Bitmap mosaicBitmap =
    new Aurigma.GraphicsMill.Bitmap(@"C:\car.jpg");

mosaicBitmap.Transforms.Crop(rect);

mosaicBitmap.Transforms.Mosaic(4, 4);

//Save patched JPEG
Aurigma.GraphicsMill.Codecs.LosslessJpegTransform losslessJpeg =
    new Aurigma.GraphicsMill.Codecs.LosslessJpegTransform(@"C:\car.jpg");

losslessJpeg.WritePatched(@"C:\car2.jpg", rect.Location, mosaicBitmap);

losslessJpeg.Close();
You may notice that with certain parameters JPEG is patched incorrectly (there is an offset on several pixels). The problem is that the WritePatched method cannot draw a bitmap with arbitrary coordinates. Coordinates must be aligned to MCU size.
To overcome this problem you should align coordinates before cropping a part of JPEG which should be processed (this way a bit wider portion of image will be processed). It can be easily done with the LosslessJpegTransform.AlignToSampleSize method. It takes your coordinates (a point or rectangle) and return them aligned to the sample size of the JPEG file which you opened.
Update Metadata Without Recompression
When processing JPEG files, it is not always necessary to modify JPEG image. Sometimes you need just to modify metadata without changes in the image itself. LosslessJpegTransform class supports four kinds of metadata and provides the following properties to alter metadata without JPEG recompression:
- Exif provides access to the ExifDictionary class instance that contains EXIF data collection;
- Iptc provides access to the IptcDictionary class instance that contains IPTC data collection;
- Xmp stores the XML code containing the XMP metadata;
- AdobeResources provides access to the AdobeResourceDictionary class instance that contains Adobe® image resource blocks.
After you open the LosslessJpegTransform object, use the properties above to access collections which store metadata of the current JPEG file. You can change necessary fields and when you call the LosslessJpegTransform.Write method, these changes will be applied.
Here is a code example demonstrating this:
Dim losslessJpeg As New Aurigma.GraphicsMill.Codecs.LosslessJpegTransform("C:\mountain.jpg")

' IPTC
losslessJpeg.Iptc(Aurigma.GraphicsMill.Codecs.IptcDictionary.Caption) = "Mountain"

' EXIF
losslessJpeg.Exif(Aurigma.GraphicsMill.Codecs.ExifDictionary.Software) = "Aurigma Graphics Mill"

' XMP
Dim xmp As New Aurigma.GraphicsMill.Codecs.XmpData(losslessJpeg.Xmp)
Dim node As New Aurigma.GraphicsMill.Codecs.XmpValueNode( _
    Aurigma.GraphicsMill.Codecs.XmpNodeType.SimpleProperty, _
    "John Doe", _
    Aurigma.GraphicsMill.Codecs.XmpTagNames.DCCreator)
xmp.AddNode(node)
losslessJpeg.Xmp = xmp.Save()

' Adobe image resource blocks
Dim arBlock As New Aurigma.GraphicsMill.Codecs.AdobeResourceBlock("Copyright", New Byte() {1})
losslessJpeg.AdobeResources.Item(&H40A) = arBlock

losslessJpeg.Write("C:\mountain2.jpg")
losslessJpeg.Close()
Aurigma.GraphicsMill.Codecs.LosslessJpegTransform losslessJpeg =
    new Aurigma.GraphicsMill.Codecs.LosslessJpegTransform(@"C:\mountain.jpg");

// IPTC
losslessJpeg.Iptc[Aurigma.GraphicsMill.Codecs.IptcDictionary.Caption] = "Mountain";

// EXIF
losslessJpeg.Exif[Aurigma.GraphicsMill.Codecs.ExifDictionary.Software] = "Aurigma Graphics Mill";

// XMP
Aurigma.GraphicsMill.Codecs.XmpData xmp = new Aurigma.GraphicsMill.Codecs.XmpData(losslessJpeg.Xmp);
Aurigma.GraphicsMill.Codecs.XmpValueNode node = new
    Aurigma.GraphicsMill.Codecs.XmpValueNode(
        Aurigma.GraphicsMill.Codecs.XmpNodeType.SimpleProperty,
        "John Doe",
        Aurigma.GraphicsMill.Codecs.XmpTagNames.DCCreator);
xmp.AddNode(node);
losslessJpeg.Xmp = xmp.Save();

// Adobe image resource blocks
Aurigma.GraphicsMill.Codecs.AdobeResourceBlock arBlock = new
    Aurigma.GraphicsMill.Codecs.AdobeResourceBlock("Copyright", new byte[] { 1 });
losslessJpeg.AdobeResources[0x040A] = arBlock;

losslessJpeg.Write(@"C:\mountain2.jpg");
losslessJpeg.Close();