Correcting Colors
Graphics Mill for .NET provides a number of algorithms to correct the bitmap colors and tone range. This topic demonstrates how to use these algorihtms.
All tone and color adjusting operations in Graphics Mill for .NET can be applied in two ways:
- Using methods of the ColorAdjustmentProvider class associated with the Bitmap.
- Using an appropriate transform class from the Aurigma.GraphicsMill.Transforms namespace.
Below you will find an overview of tone and color correction techniques implemented in Graphics Mill for .NET as well as code examples for both ways.
Brightness and Contrast
One of the most popular bitmap tone correction task is adjusting of brightness and contrast. The possibility to edit the brightness and contrast is present in most imaging applications. Although professional photo retouchers do not like these algorithms for being too rough and prefer using levels and curves correction (described below), unexperienced users prefer them because of simplicity.
Before describing how to use brightness and contrast algorithms in Graphics Mill for .NET, let's give some definitions.
Definitions
A pixel intensity is a value which characterizes the "lightness" of the pixel. For RGB values the intensity can be interpreted as a mean value of its channels.
A bitmap brightness is a degree of pixels intensity. For brevity let's assume that we are working with a grayscale bitmap. If most pixels of this bitmap have small values (e.g. close to 0), the bitmap is called dark. If, vice versa, most pixels have large values (e.g. close to the maximum value - 255 for 8-bit images, and 65355 for 16-bit images), the bitmap is called bright.
A bitmap contrast is a degree of scattering between pixel values. It can be determined as a difference between the most bright and the most dark pixel of the bitmap. When the image has low contrast, the image looks faded and the details are hardly perceptible. And vice versa, high-contrast images are sharp and details are easy to perceive.
Brightness
To modify brightness of the bitmap, the ColorAdjustmentProvider exposes the Brightness method (the appropriate transform class is Brightness). It has a single parameter - a brightness amount. It is a float value in range [-1, 1]. If it is greater than 0, the image is brightened (amount = 1 will make the image completely white). If it is less than 0, the image is darkened (amount = -1 will make the image completely black). Zero value will cause no changes.
Here is a code example which demonstrates how to use it:
bitmap.ColorAdjustment.Brightness(0.2)
bitmap.ColorAdjustment.Brightness(0.2f);
The same using the Brightness transform:
Dim brightness As New Aurigma.GraphicsMill.Transforms.Brightness
brightness.Amount = 0.2
brightness.ApplyTransform(bitmap)
Aurigma.GraphicsMill.Transforms.Brightness brightness =
    new Aurigma.GraphicsMill.Transforms.Brightness();
brightness.Amount = 0.2f;
brightness.ApplyTransform(bitmap);
Graphics Mill for .NET can also try to correct brightness in
the automatic mode. To do it, you should just use the AutoBrightness method of the
ColorAdjustmentProvider class. Alternatively
you can set the Auto
property of the Brightness
transform to true. The syntax is demonstrated here:
bitmap.ColorAdjustment.AutoBrightness()
bitmap.ColorAdjustment.AutoBrightness();
The same using the Brightness transform:
Dim brightness As New Aurigma.GraphicsMill.Transforms.Brightness
brightness.Auto = True
brightness.ApplyTransform(bitmap)
Aurigma.GraphicsMill.Transforms.Brightness brightness =
    new Aurigma.GraphicsMill.Transforms.Brightness();
brightness.Auto = true;
brightness.ApplyTransform(bitmap);
You can use the Brightness class in automatic mode not only to adjust the brightness, but also to calculate the brightness amount parameter without applying the transform itself. It is useful when you want to suggest some initial parameter to the user. Use the CalculateAutoParameters method to do it.
Contrast
To modify the contrast, you can use the Contrast method of the ColorAdjustmentProvider (or its analogue - Contrast trasform). It is very similar to brightness: it also has a single parameter - amount, which is also a value in the range [-1, 1]. Positive values mean that the contrast should be increased (value = 1 will set the image contrast to the maximum, i.e. all pixels will have either maximum or minimum intensity, without middle values). Negative values mean that the contrast will be decreased (value = -1 will make the image completely gray, i.e. all pixels will have the same value). Zero value will cause no changes.
The automatic mode works in a similar way, including the automatic calculation of the "best" contrast amount.
Here you can see a code example for the contrast:
bitmap.ColorAdjustment.Contrast(0.2F)
bitmap.ColorAdjustment.Contrast(0.2F);
The same using the Contrast transform:
Dim contrast As New Aurigma.GraphicsMill.Transforms.Contrast
contrast.Amount = 0.2F
contrast.ApplyTransform(bitmap)
Aurigma.GraphicsMill.Transforms.Contrast contrast =
    new Aurigma.GraphicsMill.Transforms.Contrast();
contrast.Amount = 0.2F;
contrast.ApplyTransform(bitmap);
Automatic mode:
bitmap.ColorAdjustment.AutoContrast()
bitmap.ColorAdjustment.AutoContrast();
The same using the Contrast transform:
Dim contrast As New Aurigma.GraphicsMill.Transforms.Contrast
contrast.Auto = True
contrast.ApplyTransform(bitmap)
Aurigma.GraphicsMill.Transforms.Contrast contrast =
    new Aurigma.GraphicsMill.Transforms.Contrast();
contrast.Auto = true;
contrast.ApplyTransform(bitmap);
Combined Brightness and Contrast
Typically both brightness and contrast should be modified simultaneously. We have provided the combined method BrightnessContrast (and the transform class BrightnessContrast) which takes two parameters - brightness and contrast amounts (which are the same as described above). It also has an automatic version which works absolutely in the same way.
We recommend to use the combined method (rather than the consequent calls of previous ones) when both brightness and contrast should be modified. It is more convenient and works slightly faster.
The code samples for the combined brightness/contrast method are demonstrated below:
bitmap.ColorAdjustment.BrightnessContrast(0.2F, -0.1F)
bitmap.ColorAdjustment.BrightnessContrast(0.2F, -0.1F);
The same using the BrightnessContrast transform:
Dim brightnessContrast As New Aurigma.GraphicsMill.Transforms.BrightnessContrast
brightnessContrast.BrightnessAmount = 0.2F
brightnessContrast.ContrastAmount = -0.1F
brightnessContrast.ApplyTransform(bitmap)
Aurigma.GraphicsMill.Transforms.BrightnessContrast brightnessContrast =
    new Aurigma.GraphicsMill.Transforms.BrightnessContrast();
brightnessContrast.BrightnessAmount = 0.2f;
brightnessContrast.ContrastAmount = -0.1f;
brightnessContrast.ApplyTransform(bitmap);
Advanced Tone Correction Techniques
As mentioned above, the brightness and contrast correction technique is blamed by professionals for being too rough. The problem is that if the brightness and contrast amount is too high, it will cause losses in highlights (or shadows for big negative values). To avoid it, more accurate tone correction techniques are used.
For better understanding, let's examine some theory.
Definitions
A bitmap histogram is a special kind of diagram which enables you to estimate tone features of the bitmap. It is represented as one-dimensional array which contains 256 elements for 8 bit per channel images, and 65355 elements for 16 bits per channel images. Each element of this array contains a number of pixels which have the same intensity value as the index of this element. E.g. the very first element of the histogram array contains a number of totally black pixels (with zero intensity), while, e.g. the 192nd element contains a number of pixels which have the intensity equalling to 191.
Visually the histogram looks like the figure below:

Using the histogram we can see the tone features of the bitmap. In particular, you can estimate image brightness. For example, if the histogram has a peak in the left part, it means that there is a big number of "dark" pixels, and therefore the entire bitmap is dark.
Histograms also enables to estimate the contrast. To do it, the idea of the tone range is used. The tone range is an interval on the histogram between the first non-zero elements (or the first elements which are above some threshold) from the left and right sides of the histogram. When the tone range is small, it means that the contrast is low (i.e. the difference between the least and most intensive pixels is small).
So to improve the image brightness or contrast we should modify the image somehow so that the peak of the histogram gets moved to the center, or the tone range gets stretched. To accomplish this, a special function is often used. This function takes the original pixel intensity and returns the modified pixel intensity. To perform tone correction, this function is applied to each pixel (and moreover, to each channel of the color pixel).
When this function is specified in a tabular form, it is called a look-up table (the abbreviation LUT is often used). In other words, a look-up table is an array, and each element specifies the value of the function with an argument which is equal to the index of this element.
By the way, the brightness and contrast algorithms may be expressed through such functions. In fact it is just a linear function y = (1 + a)/(1 - a) * x + b , where a is the contrast amount, and b is the brightness amount.
Now it is time to examine how the advanced tone correction techniques are implemented in Graphics Mill for .NET.
Levels
Level correction is a powerful technique which enables you to see how the correction affects the histogram. Graphics Mill for .NET provides two ways of using it:
- Using the ColorAdjustmentProvider.Levels
method or using the Levels transform class in a
manual mode (when Levels.Auto is set to
false). - Using the ColorAdjustmentProvider.AutoLevels
method or using the Levels transform class in an
automatic mode (when Levels.Auto is set to
true).
If you choose the automatics correction, the only thing that needs to be explained is the threshold parameter. This parameter defines how the correction will be applied. Its values range from 0 to 1 and define the percentage of pixels at the tonal range edges that will be discarded. The value 1 corresponds to 100%, but if you want to get realistic results, it is recommended to use much smaller values—less than 0.01 (1%). For example, if you want to imitate the result of the AutoLevels function of Photoshop 7, use the value 0.005 (0.5%). And if you want to get the result similar to what produces Photoshop CS or later. use the value 0.001 (0.1%).
The default value of the threshold parameter is 0.001.
The manual mode of level correction needs a bit more thorough study.
First, let us take a look at the screenshot of the Levels dialog (you can find it in the main Windows Forms demo application shipped with Graphics Mill for .NET). Each parameter of the Levels method (and appropriate transform class) is represented here as a triangle slider.
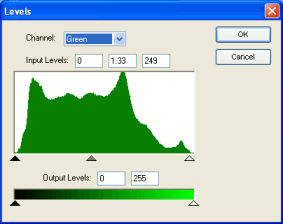
Let's comment the parameters in more details.
- Shadows - the lower bound of the input tone range. It corresponds to the left black slider of the histogram (in the center of the dialog).
- Highlights - the upper bound of the input tone range. It corresponds to the right white slider of the histogram (in the center of the dialog).
- Midtones - a value which specifies where to move the midtones of the histogram. It should be within [0.1, 10] range. Value = 1 is a neutral one. It corresponds to the central gray slider of the histogram (in the center of the dialog).
- MinimumLevel - the lower bound of the output tone range. It corresponds to the left black slider of the gradient (in the bottom of the dialog).
- MaximumLevel - the upper bound of the output tone range. It corresponds to the right white slider of the gradient (in the bottom of the dialog).
The algorithm builds a function which stretches the input tone range to the output one. Also it allows to manipulate the midtones - values greater than 1 make the midtones brighter, less than 1 - darker.
Here is a code example demonstrating how to apply levels correction:
bitmap.ColorAdjustment.Levels(0.03F, 0.9F, 0.05F, 1.5F, 0.7F, Aurigma.GraphicsMill.HistogramMode.Sum)
bitmap.ColorAdjustment.Levels(0.03F, 0.9F, 0.05F, 1.5F, 0.7F, Aurigma.GraphicsMill.HistogramMode.Sum);
The same using the Levels transform class:
Dim levels As New Aurigma.GraphicsMill.Transforms.Levels
levels.MinimumLevel = 0.03F
levels.MaximumLevel = 0.9F
levels.Shadows = 0.05F
levels.Midtones = 1.5F
levels.Highlights = 0.7F
levels.HistogramMode = Aurigma.GraphicsMill.HistogramMode.Sum
levels.ApplyTransform(bitmap)
Aurigma.GraphicsMill.Transforms.Levels levels =
    new Aurigma.GraphicsMill.Transforms.Levels();
levels.MinimumLevel = 0.03F;
levels.MaximumLevel = 0.9F;
levels.Shadows = 0.05F;
levels.Midtones = 1.5F;
levels.Highlights = 0.7F;
levels.HistogramMode = Aurigma.GraphicsMill.HistogramMode.Sum;
levels.ApplyTransform(bitmap);
This tone correction method also can be run in the automatic mode. However it cannot calculate the parameter automatically. Here is a code example for the automatic levels correction:
bitmap.ColorAdjustment.AutoLevels()
bitmap.ColorAdjustment.AutoLevels();
The same using the Levels transform class:
Dim levels As New Aurigma.GraphicsMill.Transforms.Levels
levels.Auto = True
levels.ApplyTransform(bitmap)
Aurigma.GraphicsMill.Transforms.Levels levels =
    new Aurigma.GraphicsMill.Transforms.Levels();
levels.Auto = true;
levels.ApplyTransform(bitmap);
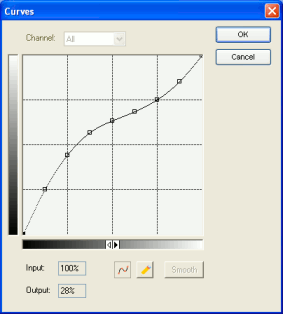
Curves
Graphics Mill for .NET enables you to specify the tone correction function explicitly. In particular you can specify the curve representing this function. The curve is specified with a set of points which are interpolated with the spline. It is works in the same way as the Curves image adjustment tool in Adobe® Photoshop®.
To apply the curves correction, use the Curves method (or the Curves transform class). It takes an array of points as an argument. These points are used to interpolate the curve. If you prefer to specify the curve in the visual mode, you can use the dialog from the main demo Windows Forms application shipped with Graphics Mill for .NET:
Here is a code example for the Curves method:
bitmap.ColorAdjustment.Curves(New PointF(2) _
 {New PointF(0.0F, 0.0F), New PointF(0.5F, 0.7F), New PointF(1.0F, 1.0F)})
bitmap.ColorAdjustment.Curves(new PointF[3]
    {new PointF(0.0F, 0.0F), new PointF(0.5F, 0.7F), new PointF(1.0F, 1.0F)});
The same using the Curves transform class:
Dim curves As New Aurigma.GraphicsMill.Transforms.Curves

curves.Points = New PointF(2) _
 {New PointF(0.0F, 0.0F), New PointF(0.5F, 0.7F), New PointF(1.0F, 1.0F)}

curves.ApplyTransform(bitmap)
Aurigma.GraphicsMill.Transforms.Curves curves =
    new Aurigma.GraphicsMill.Transforms.Curves();

curves.Points = new PointF[3]
    {new PointF(0.0F, 0.0F), new PointF(0.5F, 0.7F), new PointF(1.0F, 1.0F)};

curves.ApplyTransform(bitmap);
Look-up Tables (LUT)
Alternatively, the tone correction function can be specified in a tabular form. In other words, you can specify your own look-up table (LUT) and apply it to the bitmap.
In Graphics Mill for .NET the LUT is represented by the special class named Lut. It enables to create a LUT from different kinds of functions as well as build it manually. To apply a LUT correction, you should just create this class instance, initialize it in the way you want, and then pass to the ApplyLut method (or the ApplyLut transform class).
Dim lut As New Aurigma.GraphicsMill.Transforms.Lut

'LUT for image posterizing
lut.BuildStaircase(10, False)

bitmap.ColorAdjustment.ApplyLut(lut)
Aurigma.GraphicsMill.Transforms.Lut lut =
    new Aurigma.GraphicsMill.Transforms.Lut();

//LUT for image posterizing
lut.BuildStaircase(10, false);

bitmap.ColorAdjustment.ApplyLut(lut);
The same using the ApplyLut transform class:
Dim applyLut As New Aurigma.GraphicsMill.Transforms.ApplyLut

'LUT for image posterizing
applyLut.Lut.BuildStaircase(10, False)

applyLut.ApplyTransform(bitmap)
Aurigma.GraphicsMill.Transforms.ApplyLut applyLut =
    new Aurigma.GraphicsMill.Transforms.ApplyLut();

//LUT for image posterizing
applyLut.Lut.BuildStaircase(10, false);

applyLut.ApplyTransform(bitmap);
The look-up tables can be used not only for tone corrections, but also for other kinds of effects. E.g. you can create an artistic posterization effect by applying a LUT which represents the staircase function.
Color Adjustment
All previous algorithms work with intensity values of pixels. They modify tone features of the bitmap. However sometimes it is necessary to work with the pixel colors rather than their tone characteristics. Let's examine what approaches are used in Graphics Mill for .NET to accomplish this task.
Channel Balance
Graphics Mill for .NET supports two types of color pixel formats - RGB and CMYK. Both of them assumes that each pixel consists of several channels:
- RGB pixel consists of three values (channels) - red, green, and blue.
- CMYK pixel consists of four values (channels) - cyan, magenta, yellow, and black.
It is obvious that if we modify the value of only one channel, the pixel color will be changed, and moreover - the result will be predictable. E.g. if we increase the value of the red channel of an RGB pixel, the color will become more reddish, etc.
The method ChannelBalance(Single[]) of the ColorAdjustmentProvider (as well as an appropriate ChannelBalance transform) uses this fact. It takes only one argument - an array of channel modifiers. The value of the first element of this array will be added to the first channel, the value of the second element will be added to the second channel, etc. These values are specified in the range [-1, 1] (they will be normalized depending on the number of bits per channel).
Here is a code example which demonstrates how to use it:
Dim channelBalance As New Aurigma.GraphicsMill.Transforms.ChannelBalance
'Picture has Format24bppRgb pixel format
'R: 0.2F  G: -0.1F  B: 0.05F
channelBalance.Levels = New Single(2) {0.2F, -0.1F, 0.05F}
channelBalance.ApplyTransform(bitmap)
//Picture has Format24bppRgb pixel format
//R: 0.2F  G: -0.1F  B: 0.05F
bitmap.ColorAdjustment.ChannelBalance(new Single[3] {0.2F, -0.1F, 0.05F});
The same using the ChannelBalance transform class:
'Picture has Format24bppRgb pixel format
'R: 0.2F  G: -0.1F  B: 0.05F
bitmap.ColorAdjustment.ChannelBalance(New Single(2) {0.2F, -0.1F, 0.05F})
Aurigma.GraphicsMill.Transforms.ChannelBalance channelBalance =
    new Aurigma.GraphicsMill.Transforms.ChannelBalance();
//Picture has Format24bppRgb pixel format
//R: 0.2F  G: -0.1F  B: 0.05F
channelBalance.Levels = new Single[3] {0.2F, -0.1F, 0.05F};
channelBalance.ApplyTransform(bitmap);
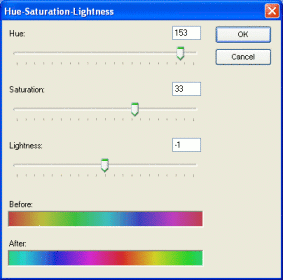
Hue-Saturation-Lightness
Modifying the RGB or CMYK channels is often inconvenient. It allows the user to predict whether the color will be more bluish or less reddish, but it is hard to foretell whether the color will be lighter or less saturated.
There is an alternative color adjustment way available. It takes more user-friendly parameters - hue, saturation, and lightness modifiers of the color. Each color is converted into HSL color space (HSL stands for Hue-Saturation-Lightness), these modifiers are added to the hue, saturation, and lightness channels, then this pixel is converted back to the original color space. This way you can make all pixels of the bitmap less saturated by specifying a negative saturation modifier.
The ColorAdjustmentProvider provides a method named AdjustHsl(Single, Single, Single). Usually, it has a sibling AdjustHsl transform class. They take three modifiers as parameters - hue, saturation, and lightness.
Here is a screenshot of the Hue-Saturation-Lightness adjusting dialog of the main demo Windows Forms application:
The code example for the HSL adjustment is demonstrated below:
bitmap.ColorAdjustment.AdjustHsl(0.1F, -0.2F, 0.1F)
bitmap.ColorAdjustment.AdjustHsl(0.1F, -0.2F, 0.1F);
The same using the AdjustHsl transform class:
'... bitmap instantiation is omitted for brevity

Dim hsl As New Aurigma.GraphicsMill.Transforms.AdjustHsl
hsl.Hue = 0.1F
hsl.Saturation = -0.2F
hsl.Lightness = 0.1F
hsl.ApplyTransform(bitmap)
//... bitmap instantiation is omitted for brevity

Aurigma.GraphicsMill.Transforms.AdjustHsl hsl =
    new Aurigma.GraphicsMill.Transforms.AdjustHsl();
hsl.Hue = 0.1F;
hsl.Saturation = -0.2F;
hsl.Lightness = 0.1F;
hsl.ApplyTransform(bitmap);